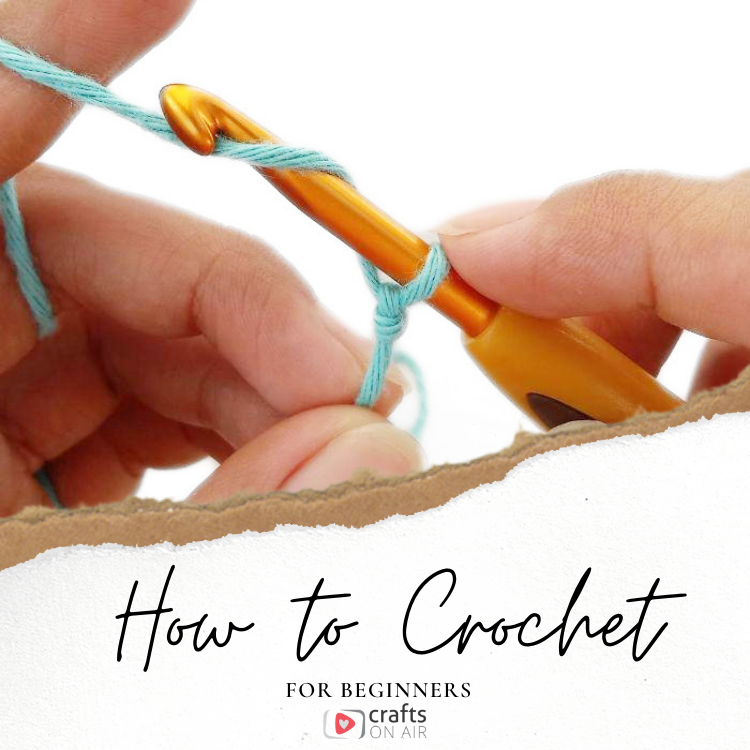
Are you interested in learning how to crochet? This beginner-friendly guide shows you what it takes to learn crochet step-by-step. The learning process is easier than you think. You can start at any age and as long as you have a teachable attitude and a willingness to learn and put in the time and effort, you will be able to start crocheting beautiful items with just a hook and some yarn.
Get ready to learn how to crochet with this guide, which covers supplies, skills, crochet stitches, pattern ideas and more.
What Is Crochet?
Crochet uses yarn and a single hook to work interlocked loops of yarn into fabric. This distinguishes crochet from knitting, which uses two needles and yarn to make fabric.
The word is derived from the old French croche, and crochet is the word used in English, Spanish, French, Italian and Belgian (it’s haken in Holland and vikning in Sweden, among other words). Croche is the Middle French word for hook.
It’s not clear exactly when crochet originated as a craft, though it is thought to have started in the 1500s or 1600s, and probably developed from a Chinese needlework technique.
What we do know is that crochet spread throughout Europe in the early 1800s, and that Irish crochet cooperatives helped families survive the famine of the 1840s, with many moving to America and spreading the craft further. If you’d like a more in-depth history of crochet, check out this informative post here.
Different Kinds Of Crochet
If you are just learning how to crochet, you might not realize that there are a number of different kinds of crochet styles and techniques used. Here’s a quick rundown:
What you might think of as standard traditional crochet uses a hook and basic crochet stitches to make a fabric. It can be a single crochet stitch repeating across the fabric or use different stitches or motifs that are joined together to make projects.
Filet Crochet
Filet crochet is a way to make designs on fabric that is typically made just with chains and double crochet stitches. The result is a grid-like lace that can be surprisingly detailed.
Tunisian Crochet
Tunisian crochet uses a special long crochet hook (sometimes referred to as an afghan hook) or a hook with a cable on the end. Instead of working one stitch at a time, you pick up loops all the way across the fabric, then work back across until you have one loop on the hook again. Tunisian crochet can look similar to knitting but there are many Tunisian stitches with different looks. You might also hear this called afghan crochet because Tunisian crocheted afghans were quite popular in the 1970s.
Aran Crochet
Aran crochet is the term for crochet with cables and textured stitches similar to aran designs in knitting. You may be familiar with the word “aran” from its terminology referring to a specific weight of yarn but keep in mind that “aran crochet” is a style or type of crochet pattern. Historically, aran crochet has been a Celtic style of crochet that is used to make stunning chunky sweaters, beanies, and blankets.
Tapestry Crochet
Tapestry crochet is a method of colorwork similar to intarsia in knitting, where different strands of yarn are used to make blocks of color across the fabric to create the design. Tapestry crochet usually involves a number of different yarn colors that you carry along with you, working over it as you crochet the row. It’s typically worked using the single crochet stitch.
Amigurumi
Amigurumi is a term that comes from Japanese, and it’s more of a genre than a specific crochet technique. Typically, amigurumi crochet are small stuffed dolls or animals, but they can also be food, inanimate objects or anything else you want to make small and adorable. Amigurumi is worked in the round and generally uses the single crochet stitch.
Corner To Corner
Also referred to as C2C crochet, corner-to-corner is another common crochet technique that can be worked in a solid color, stripes or intricate colorwork designs. You start from one corner and increase stitches as you go, incorporating the pattern as you stitch. When you get to the center you work back down to the opposite corner by decreasing in the same manner. The typical stitches used in corner to corner include the double crochet stitch, half double crochet stitch and the moss stitch.
Is Knitting Or Crochet Easier?
If you are thinking about learning to crochet, you might wonder if knitting or crochet is easier to learn. As with most things, the answer is “it depends.”
Some say that crochet is easier than knitting to learn because there are fewer movements involved to get the basics right. If you can make a slip knot, chain and yarn over (which you’ll learn from this how to crochet guide) you can make a lot of basic crochet stitches.
Because you’re usually dealing with only one stitch at a time, it’s easier to rip out crochet to fix mistakes. Crochet stitches also tend to be larger than knitting stitches, which makes it easier to see what you’re doing and creates more fabric more quickly, which can be reassuring when you’re just starting out.
On the other hand, knitting might take a little more dexterity, but because all the loops are on the needles, it’s easy to see where you need to go to work the next stitch. It can also feel more stable because you have needles holding the work for you.
If you’re looking for a new hobby it’s worth it to try both, but of course we’re here to learn how to crochet so let’s talk about that!
What Will I Need To Learn How to Crochet?
The great news is you don’t need a lot of tools and supplies when learning to crochet. In fact you can get started with a single ball of yarn and a single crochet hook. But of course there are a lot of options out there for both, so let’s dig a little deeper.
Yarn
Yarn is the most important ingredient in your crochet project. There are lots of factors to consider for crochet yarn – the weight of the yarn, what it’s made out of, how it looks and feels, even how it’s presented when you buy it.
We’ll dive deeper into different types of yarn shortly, but one thing you should know before you head to the store is that there are actually several different ways yarn can be presented when you buy it.
The main options are a ball, skein and hank.
What is a Ball of Yarn?
A ball of yarn is what it sounds like, though a purchased ball of yarn won’t be tightly wound like you imagine a ball of yarn to look.
What is a Skein of Yarn?
A skein is the classic looking oblong shaped roll of yarn. Generally, yarn that comes in a skein is pulled from the middle but some people prefer starting with the yarn on the outside of the skein.
What is a Hank of Yarn?
A hank of yarn looks a little bit like a braid; when you untwist the hank it becomes a big circle.
Both balls and skeins can be used immediately in the form they came in (once you take the ball band off if needed) and generally can be worked with the yarn coming from the outside or the inside, also known as center pull.
With a hank of yarn you need to spread out the circle of yarn (two chair backs work if you don’t have the proper tool for the job, known as a swift) and wind it into a ball before you crochet with it.
It doesn’t matter how your yarn is presented, just be aware that a hank requires that extra preparatory step.
Crochet Hook
Once you’ve got your yarn sorted, it’s time to consider the other basic tool of crochet: the crochet hook.
Sometimes people refer to crochet hooks as crochet needles, but usually these are people who don’t know the difference between knitting and crochet. As we know, crochet uses one hook while knitting uses two needles.
There are many different types of hooks made out of different materials and even shaped differently. And of course hooks come in different sizes for use with different yarns.
Notions And Other Crochet Tools

While yarn and a hook are the most basic things you need to learn how to crochet, there are a few other tools that will be helpful, such as:
Stitch Markers
Stitch markers can be used to mark the beginning of a round when crocheting in the round and can help you count rows and keep track of where you are. You need what’s known as locking stitch markers, which might look like little safety pins that can be clipped onto a stitch.
Tapestry Needle
Tapestry needles are large, blunt needles for weaving in ends or seaming pieces of crochet together.
Scissors
A small pair of scissors or thread snips makes short work of cutting yarn. You can also buy special yarn cutters, but scissors are fine for this job.
Tape Measure
A tape measure is needed to measure your swatches and your project as you work
Gauge Ruler
If you want to get fancier, you can buy a gauge ruler, which has a marked out 4 by 4 inch space that makes it easier to count your stitches on your swatch.
Blocking Supplies
This tool isn’t essential for new crocheters, but blocking mats and rust-proof straight pins can be helpful when crocheting garments or motifs like granny squares that need to be a consistent size for sewing together.
What Is A Crochet Hook?
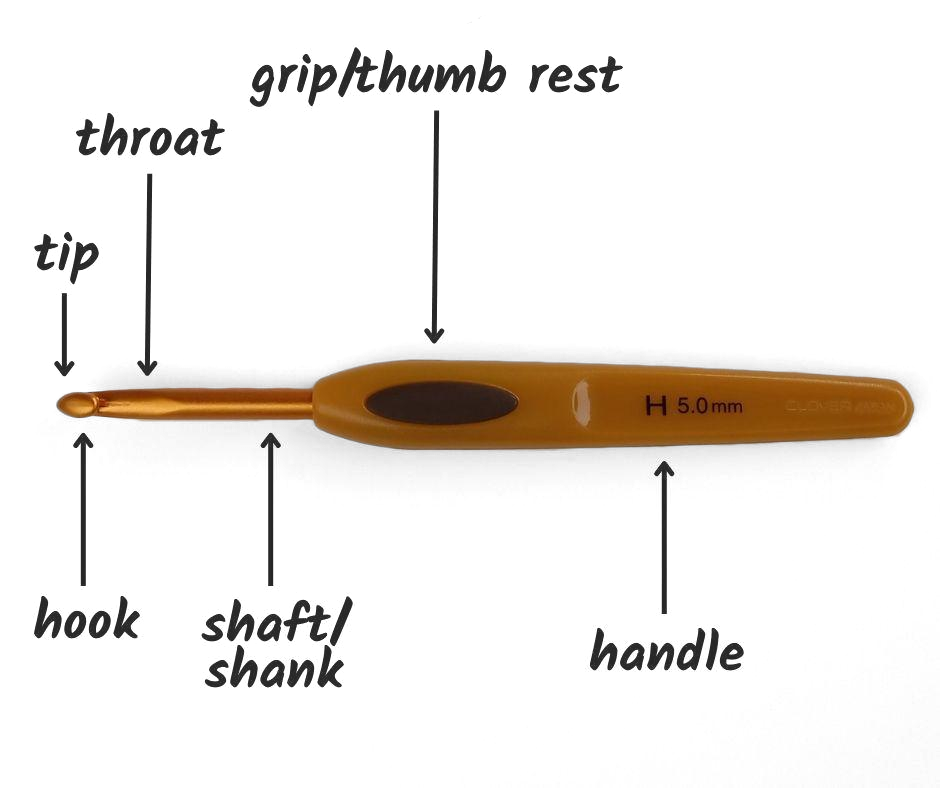
A crochet hook is the tool that you use to make crochet stitches. It is typically made up of a handle that’s a few inches long. Toward the hook end, there is often a flatter area called the grip or thumb rest, which is where you hold the hook as you are stitching. Some hooks are straight and don’t include this flat area, but you hold the hook in the same place regardless.
The portion of the handle between the thumb rest and the taper for the hook is known as the shaft or shank. The tapered part that leads into the hook is called the throat, then you have the hook and the end of the hook is called the tip.
To make a crochet stitch, you hold the hook at the grip, use the tip to maneuver the hook into the stitch, catch the yarn with the hook and pull it through to form the stitch.
Types Of Crochet Hooks
Crochet hooks can be made out of lots of different materials, but they are most commonly aluminum or steel, plastic, wood or bamboo.
Aluminum Crochet Hooks
You’ll easily find aluminum crochet hooks in any craft store, and they typically aren’t that expensive. They feel cold and hard in your hands and aren’t flexible. Some people find that the yarn moves more quickly when they work with metal needles because they are slippery. This can be good or bad depending on the yarn you’re using and your experience level.
Plastic Crochet Hooks
Plastic hooks are also pretty common. They are lighter in weight than metal hooks and don’t feel cold. They aren’t as slippery as metal hooks, either. One thing to note is that they don’t always have their size printed on them, so if you amass a collection of plastic hooks you’ll probably also need a hook gauge.
Wood Crochet Hooks
Wooden and bamboo hooks tend to be more expensive than other options. They warm up in your hands and are a little flexible. They also tend to grab the yarn in a way that slows your stitching down, which can be helpful with slippery yarn.
What Is An Inline Crochet Hook?
Another consideration when it comes to choosing a crochet hook is how the hook itself is set on the hook. So-called inline hooks have the hook in line with the shaft. They tend to have a pointier end and a deeper throat than other hooks.
What Is A Tapered Crochet Hook?
The other option is a tapered hook, where the shaft of the hook tapers into the hook itself, so the hook isn’t in line with the shaft. They tend to have a bit of a rounder tip.
Some newer crocheters find the inline style of hooks to be a little easier to use because they hold the yarn better as you’re forming the stitches, and the pointier end can make it a little easier to get the hook into the loop of the stitch where you need to go.
On the other hand, people who like tapered crochet hooks find them a little better for wrist pain, because it doesn’t take as much movement to make stitches.
As with everything as you are learning how to crochet, you might want to try both kinds of crochet hooks to see which you prefer.
Brands Of Crochet Hooks
In the United States, there are two main brands of metal hooks that are readily available: Susan Bates and Boye. Bates hooks are inline and Boye is tapered.
Clover is another popular tapered-style brand and they sell inexpensive ergonomic crochet hooks, which are good to try if you have wrist pain from crocheting.
Tulip Etimo is another popular crochet hook that has comfort grip handles, and they are described as being gently tapered, or not quite inline.
If you’re looking for a crochet hook that’s both beautiful and ergonomic, you may want to consider Furls Crochet Hooks. These crochet hooks are works of art and come in both wood and acrylic formats. The hooks will also help save your hands and fingers from cramping and pain. Their price point is higher than many other crochet hooks. People who love them say they’re worth it, but this may not be the first set of crochet hooks you want to run out and buy.
Hook Sizes
Crochet hooks come in a range of sizes to correspond to different thicknesses of yarn (typically known as yarn weight). In America, crochet hooks often have number and letter designations, with higher numbers and later letters of the alphabet corresponding to larger hooks.
Elsewhere you will see hooks measured in millimeters (mm), or you may see all three measurements on the same hook. Here’s what the different numbers and letters mean:
| MILLIMETER RANGE | U.S. SIZE RANGE |
|---|---|
| 2.25mm | B-1 |
| 2.50mm | |
| 2.75mm | C-2 |
| 3.125mm | D |
| 3.25mm | D-3 |
| 3.50mm | E-4 |
| 3.75mm | F-5 |
| 4mm | G-6 |
| 4.25mm | G |
| 4.50mm | 7 |
| 5mm | H-8 |
| 5.25mm | I |
| 5.50mm | I-9 |
| 5.75mm | J |
| 6mm | J-10 |
| 6.50mm | K-101/2 |
| 7mm | |
| 8mm | L-11 |
| 9mm | M/N-13 |
| 10mm | N/P-15 |
| 11.50mm | P-16 |
| 12mm | |
| 15mm | P/Q |
| 15.75mm | Q |
| 16mm | Q |
| 19mm | S |
| 25mm | T/U/X |
| 30mm | T/X |
How To Hold A Crochet Hook
There is no right way or wrong way to hold your crochet hook, and whatever feels natural to you as you are learning to crochet will probably be the method you stick with. That said, there are two common ways that people typically hold the crochet hook to make crochet stitches.
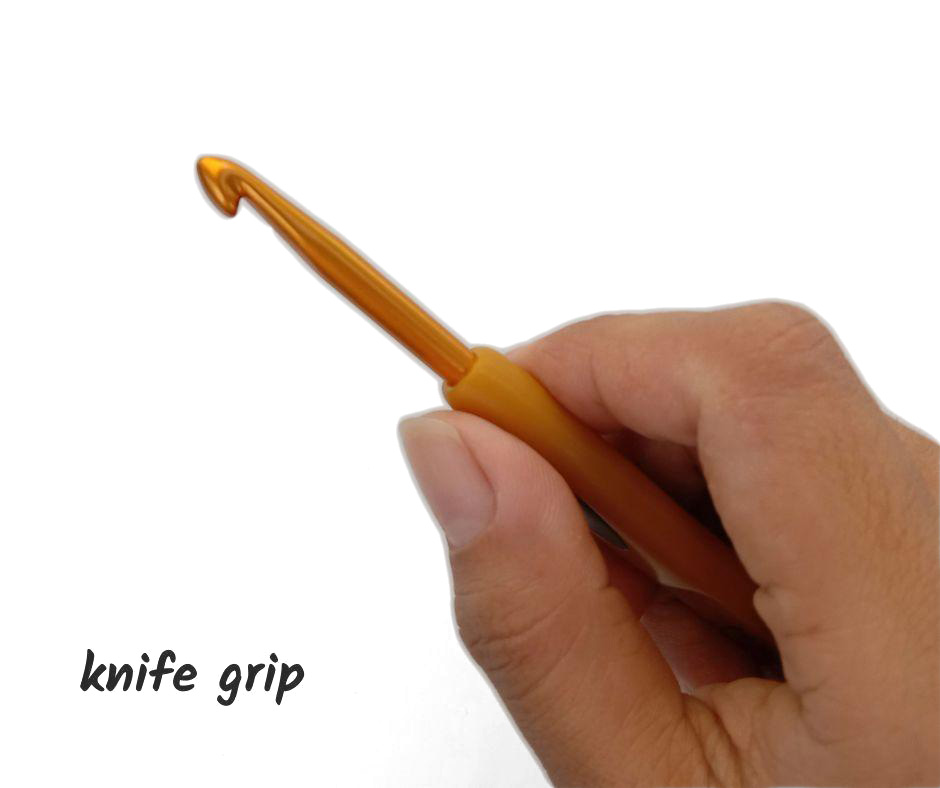
The knife grip involves placing the thumb on the front of the hook shaft, with the other fingers gripping the hook from behind, somewhat like you might hold a knife.
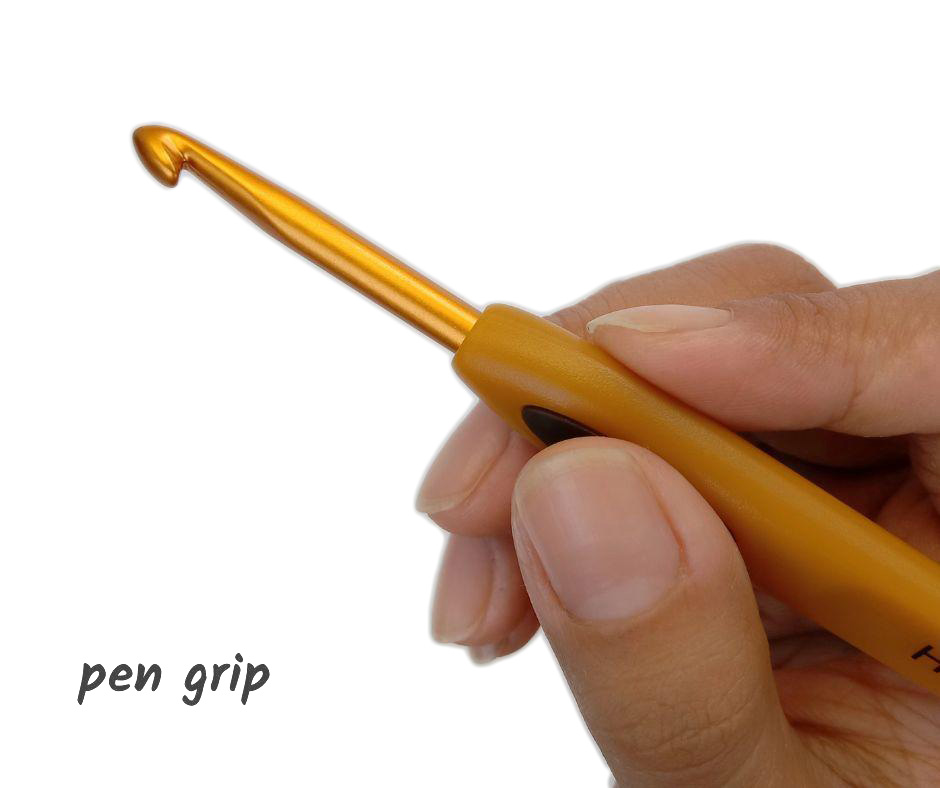
The pencil grip is more like you would hold a pencil: the thumb is in basically the same place on the front of the hook, but the index finger rests on top of the hook and the other fingers support from the back.
If your hook has a flat spot on the shaft that’s where your thumb should go, regardless of the hold you use. Try both and see which feels more natural to you.
Yarn In Crochet
Crochet yarn is not anything special or different from the yarn used for knitting, with one exception, which is known as crochet thread or crochet cotton. Crochet thread is usually what’s known as mercerized cotton, which goes through a special process that makes it strong and shiny.
Crochet thread is the yarn that’s used for projects like crochet doilies and other fine, detailed projects.
Types Of Yarn Fibers
Yarn can be made from all sorts of materials, including natural materials and those made by humans.
Yarn is typically divided into categories of natural fibers and synthetic fibers.
Natural Yarn Fibers
Natural fibers include those that come from animals, like wool, alpaca, mohair and silk, but also cotton, bamboo and linen.
Synthetic Yarn Fibers
Synthetic fibers are things like acrylic, nylon and polyester that are made by extruding petroleum products. These yarns typically have similar characteristics to natural fibers. For example there are acrylic yarns that try to mimic the qualities of wool, while nylon can be similar to silk or bamboo.
Different Styles of Yarn
Yarn can also come in many different textures, from smooth, plied cotton to fluffy wool singles that are barely spun, to funky textured yarns.
While these options can all be fun, the best yarn for crochet when you’re learning is a smooth, plied, light-colored yarn to learn to crochet with as your stitches will be easy to see and you won’t be fighting the yarn with your hook.
What Is Yarn Weight (Thickness)
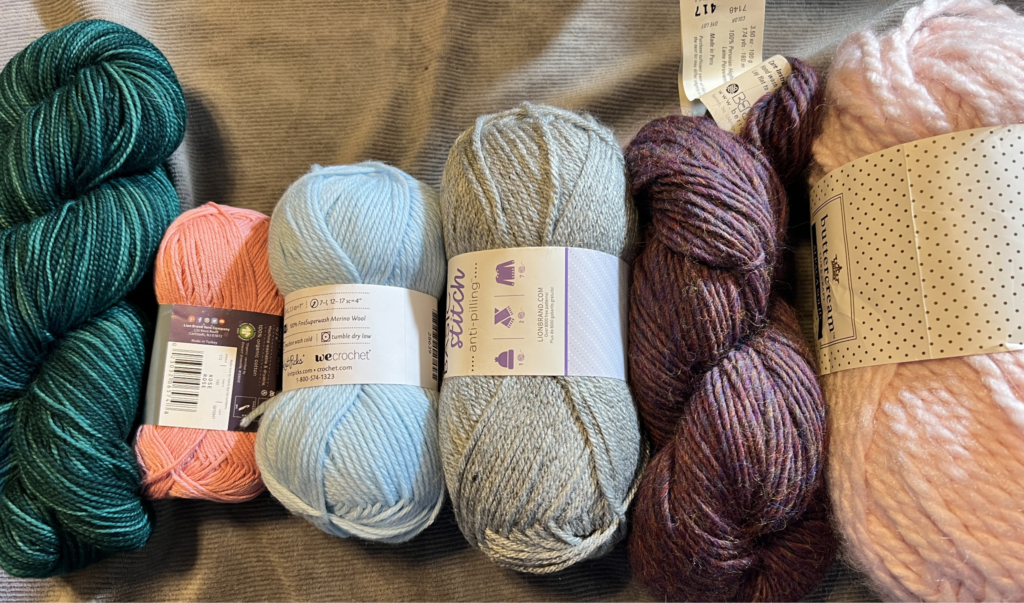
Yarn weight refers to the thickness of the yarn. There are standard measurements for yarn companies to follow when classifying yarns on a scale of 0 to 7, with 1 being the smallest and 7 being the biggest.
Each number corresponds to a category as follows:
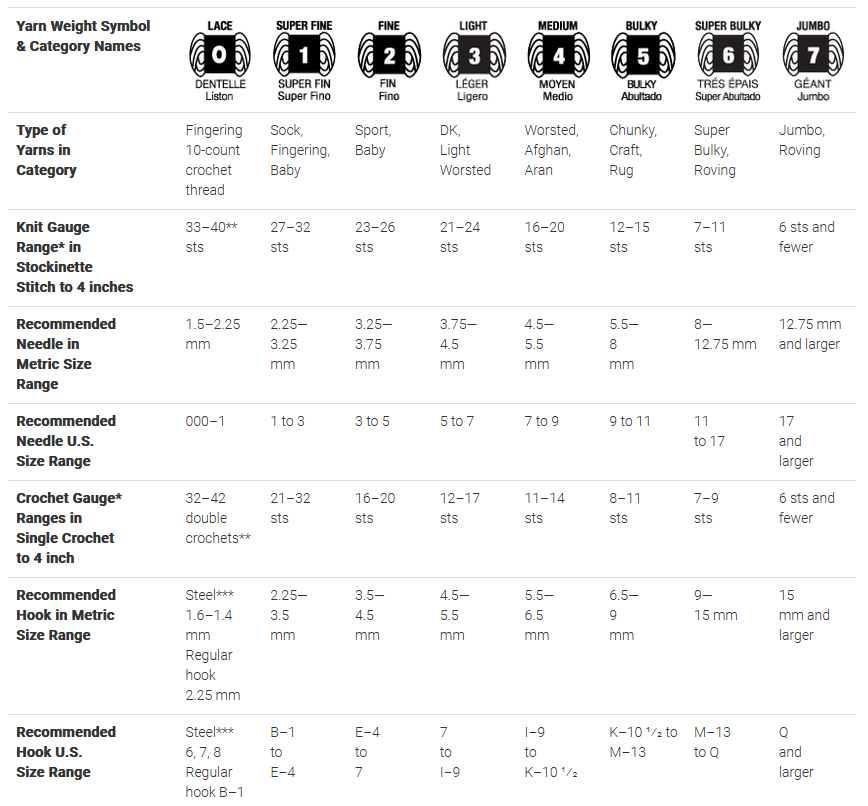
There is some variation in this list, as lace weight yarns are often labeled 1, and sometimes you’ll find things with words like “heavy worsted” or other descriptors that don’t quite fall into these labels.
As long as the number on the yarn ball corresponds to what the crochet pattern you want to make suggests, you generally should be fine. The best yarn for crochet when you are just starting out is a medium weight/size 4 yarn otherwise knows as worsted weight yarn.
How To Match Your Crochet Hook To Your Yarn Weight
If all of this sounds super confusing, don’t worry. The pattern you’re using will tell you both the size yarn and the hook size that was used to make the project.
This gives you a good place to start when deciding what yarn and hook to use for your project (see tips for tension, below, on when you might not want to use the same hook as suggested).
If you’re just practicing how to make crochet stitches or want to design your own crochet project, consult the yarn ball band to see what the recommended hook size is. Balls of yarn typically come with a label that either has a chart showing the stitch gauge (how many stitches and rows per inch/4 inches you should get with a given hook) or words that say how many stitches you should get with a particular hook.
Note: Some ball bands only list gauge for knitting, not crochet. But if there is a millimeter listing for the knitting needles used, you can use that same millimeter measurement to choose your crochet hook.
How To Read A Crochet Pattern
Patterns, even free crochet patterns, typically include the same types of information to make it easy for you to make the project in the same way the designer did.
At the top you will find information about the yarn and hook size used, how much yarn was needed, and the gauge using the given yarn, hook and stitch.
You’ll also see what size the finished object should be and whether there are different sizes available, as for garments. Typically as you read through the crochet pattern the instructions for the smallest size will be given first, with larger sizes listed in order in parentheses. So for example it might say to chain 12 (18, 24, 30). If you want to make the third size, you would chain 24 and always follow the instructions/stitch counts in that position in the pattern.
Pro Tip: If you print out your crochet pattern, you can underline or highlight the numbers for the size you are making before you start stitching so you don’t have to hunt for your place in the pattern each time.
Crochet patterns often use abbreviations to make the patterns a little shorter, but this code can be difficult for new crocheters to understand. The pattern should include a key to the abbreviations if there are any uncommon ones, but you may find some abbreviations without explanations such as:
| ABBREVIATION | DESCRIPTION |
|---|---|
| Ch | chain |
| Sts | stitches |
| SC | single crochet |
| DC | double crochet |
| HDC | half double crochet |
| TC | triple or treble crochet |
| FP | front post |
| BP | back post |
| Inc | increase |
| Dec | decrease |
For more detail on what basic abbreviations and terms in crochet patterns mean, check out this post on how to read a crochet pattern from the Craft Yarn Council.
Basic Crochet Techniques For Beginners
Here are some of the crochet basics are things you need to know before you start learning how to crochet, such as how to hold your hook and yarn and how to start your foundation for your stitches.
How To Hold Your Crochet Hook And Yarn
The simplest answer when it comes to the way to hold your hook and yarn in whatever way you feel most comfortable and are able to control the yarn and make stitches you like.
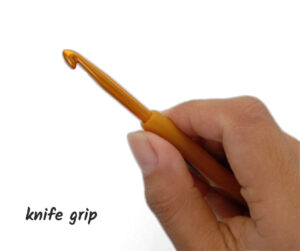
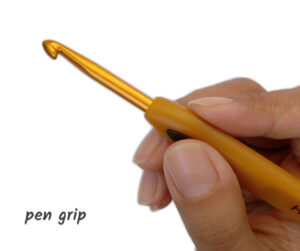
That said, there are some common ways that people hold their hooks and their yarn that are a good place to start as you learn how to crochet. People tend to hold the crochet hook in their dominant hand.
Most crocheters hold the yarn with their non-dominant hand, wrapping the yarn around a couple of fingers to hold it in place and provide tension on the yarn. This again will be something you need to play with to find what feels good to you and allows you to make crochet stitches that look good.
Tips For Tension
In crochet, tension refers to a few things. You keep tension on the yarn as you stitch to make sure the stitches come out even and consistent. Tension has to do with how firmly or loosely you crochet, and it can also mean how many stitches you are getting per inch of crochet.
Tension can affect the way your crochet looks because if you don’t keep an even tension on the yarn, you may have some stitches that are looser than others, which will make for an uneven fabric.
If your tension is too tight, your crocheted fabric may roll excessively, or be too firm. Tension that is too loose may make your fabric more open than you would like, and it may cause the fabric to stretch more when you wear a garment crocheted with loose tension.
If you have trouble keeping your stitches even, some yarn management tricks may help. Some stitchers recommend pulling yarn from the center of the skein or winding yarn into a cake (which is the shape you get when you use a ball winder and swift to deal with a hank of yarn), both of which help the yarn flow more smoothly. If you have to fight with the yarn coming out of the ball or skein, odds are more likely your tension won’t be perfect.
As you learn how to crochet, keeping an even tension will get easier for you. It’s important to take the time to practice a bit with the yarn and hook you plan to use for a project before you dive in. This way you can see what the stitches look like and whether you like them before you commit to making the whole project.
This is also where the other type of tension, also known as gauge, comes in. If you’re working from a crochet pattern it should have a listing of the pattern’s gauge, that is, the number of stitches and rows per inch or 4 inches the designer got working the pattern stitch with the yarn and hook size suggested in the pattern.
Did you know that just because a pattern calls for a particular crochet hook that doesn’t mean it’s the size hook you should use? It’s true! You should always crochet a swatch that’s a little larger than the suggested gauge for the pattern, and wash it like you plan to wash your finished object, then measure that and see if you have the same gauge as the pattern calls for.
If you have more stitches per inch (or 4 inches) than the pattern calls for, you need to use a bigger hook and try again. If you have fewer stitches than required, you’ll want to try with a smaller hook.
Why does this matter? Because if you’re stitching something that you want to come out a particular size, you need to be getting the same number of stitches as the crochet designer did. Otherwise, you might crochet a hat that comes out a lot bigger – or a lot smaller – than you intend and won’t fit the intended recipient.
The Anatomy Of A Crochet Stitch
Crochet stitches can all look very different but they start out in the same way. Crochet projects typically start with a slip knot and a chain, into which stitches are worked to form the crochet fabric.
Different crochet stitches have different heights based on how the stitch is worked, but they are largely made by working yarn overs and pulling through loops at different times.
The center part of the stitch is called a post, and some stitches are worked through the front post or back post (this is how you make ribbing in crochet, for example) or even around the post. Most basic crochet stitches are worked through the top part of the stitch, which looks like a chain.
How To Make A Slip Knot
The slip knot is the foundation for all crochet because you need one in order to start your chain.
When you begin a crochet project, it’s important to leave a few inches of yarn before you make your slip knot. This gives you an end to weave in, which helps keep the slip knot from loosening.
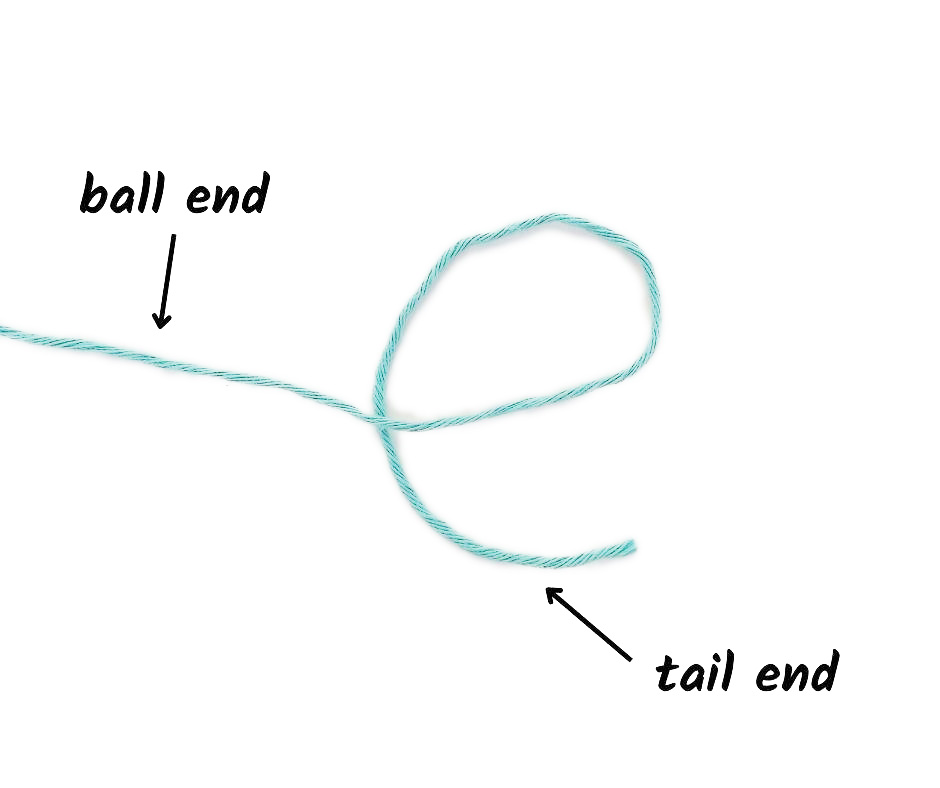
To make a slip knot, make a loop in the yarn so that it looks like a lowercase “e”. The tail end is the bottom of the “e” and loops under the ball end of the yarn to form the loop.
Stick your thumb and index finger inside the loop and grab the ball end of the yarn and begin to pull it through the loop. As you pull this will make a new loop and the old loop becomes the knot. You can make the loop smaller by gently pulling on the yarn ends.
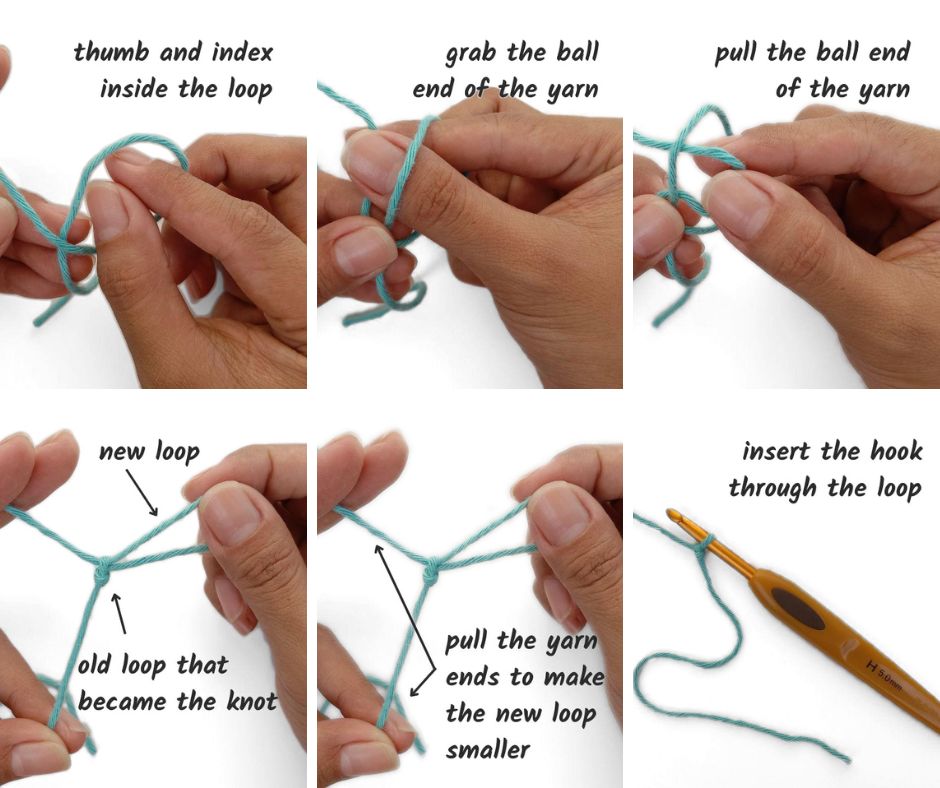
The loop can then be slipped onto your crochet hook. It shouldn’t be so tight that you can’t move around it easily, but also not so loose that it falls off the hook.
How To Make A Yarn Over
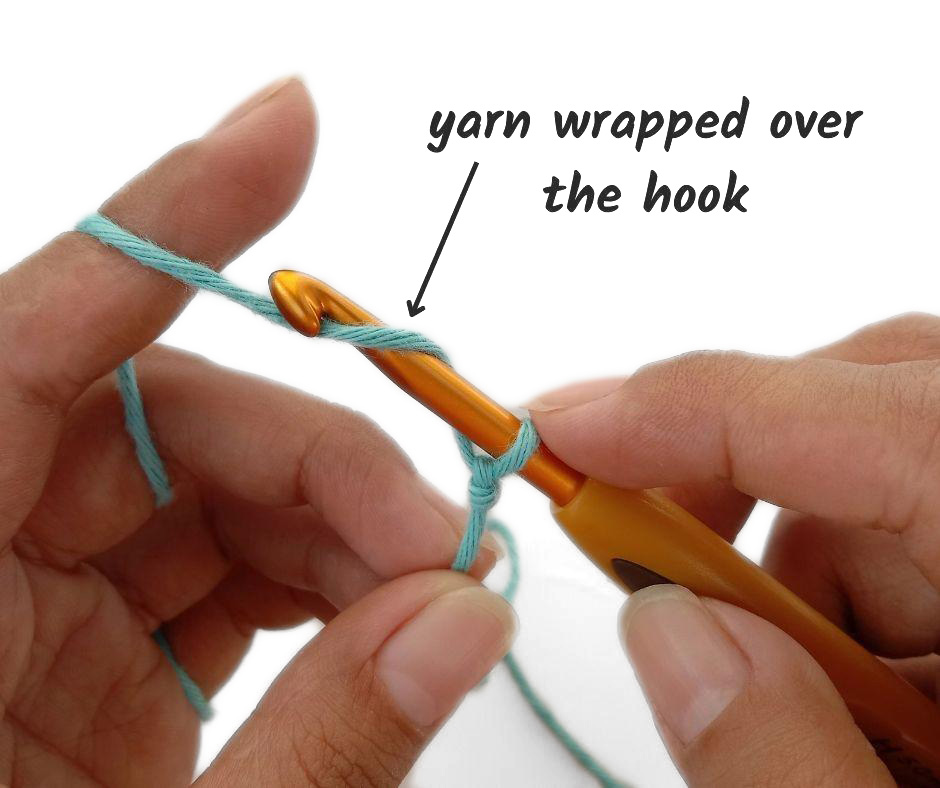
The yarn over is a basic move in crochet that allows you to form both the starting chain and the stitches themselves. In patterns you will often see it abbreviated as yo.
This is exactly what it sounds like: just place the ball end of the yarn, coming from behind the hook, over the hook to the front.
How To Make A Starting Chain
Now that you know how to make a slip knot and yarn over you can make a starting chain, which is going to be the base for your crochet stitches.
Begin with a slip knot. Yarn over and use the hook to pull the yarn through the loop of the slip knot. This is called pulling up a loop. The new loop should be about the same tension as your slip knot, that is, not too tight and not too loose.
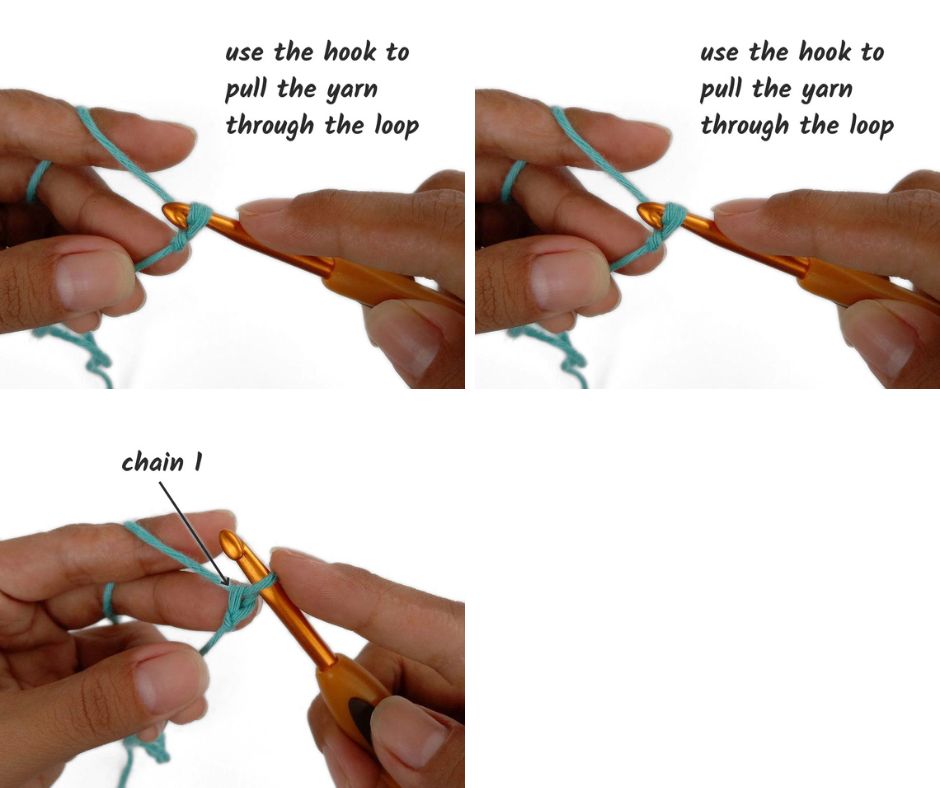
Continue to yarn over and pull through loops until you have the length of chain you need for your project.
Note: The slip knot does not count as a stitch, and neither does the loop on your hook, so you actually have to chain 13 times to make 12 stitches.
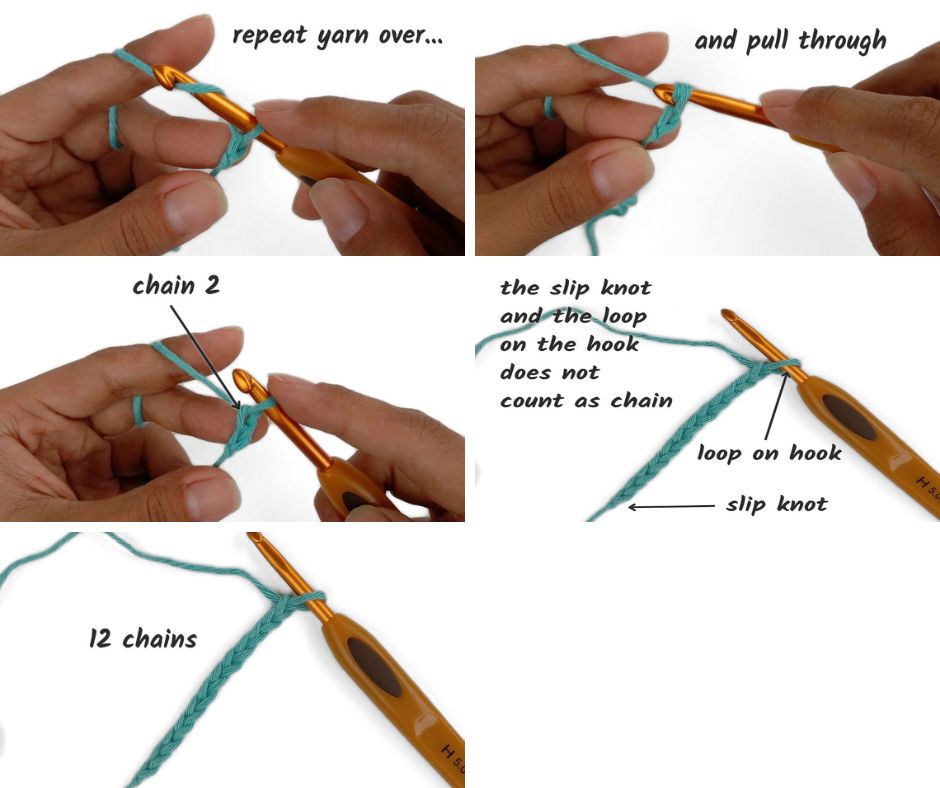
Pro Tip: The easiest way to count your chain stitches is to look at the top of the chain. Each stitch should look like a little “v”.
How to Work Into The Crochet Chain
To make your first crochet stitches, you need to work into the chain. Depending on the kind of stitch you are making (more on those below) you’ll either do a yarn over or two first or work directly into the chain.
It also depends on what stitch you are doing exactly which chain you work into. That’s because those extra chains give the work height so there is room to form the stitches without distorting the side of the work.
For a single crochet stitch, for example, you would work into the first chain after the one on the hook.
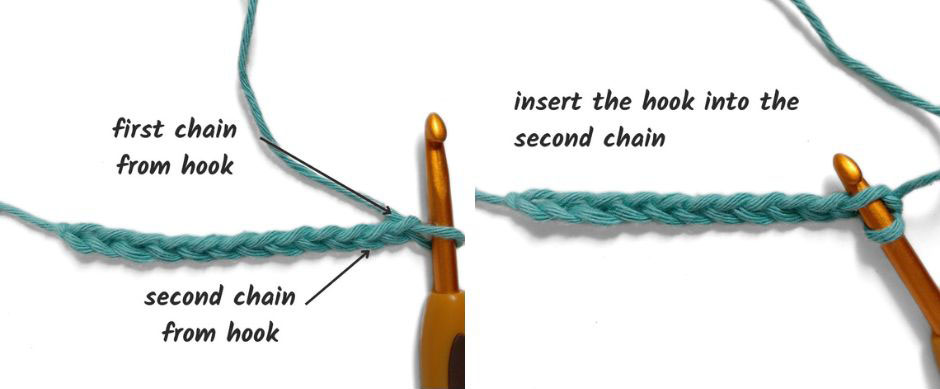
For a double crochet you work into the fourth chain from the hook because a double crochet stitch is taller. Whenever you learn a stitch it will tell you which chain to start with.
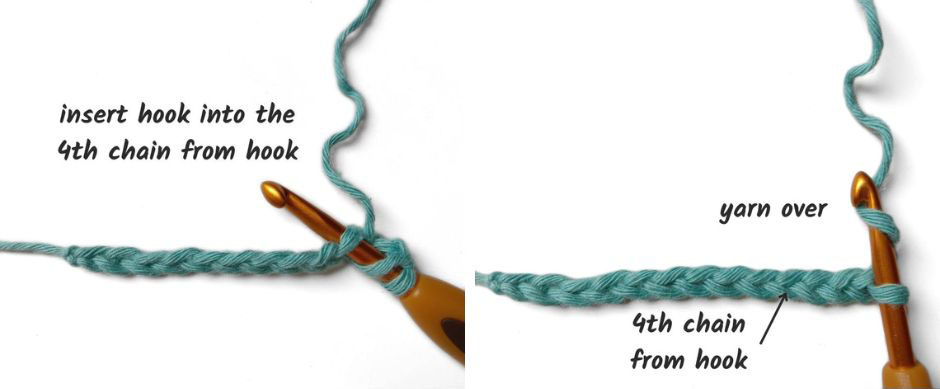
Put the end of the crochet hook under the “v” to start working the stitch, and complete it as the instructions for that stitch explain it. Typically you will work into each chain unless otherwise specified in the pattern.
How To Make A Turning Chain
What is a turning chain in crochet? A turning chain is made at the beginning of a row to “lift” and transition the work to the next row or round. The taller the stitches, the longer your chain will need to be.
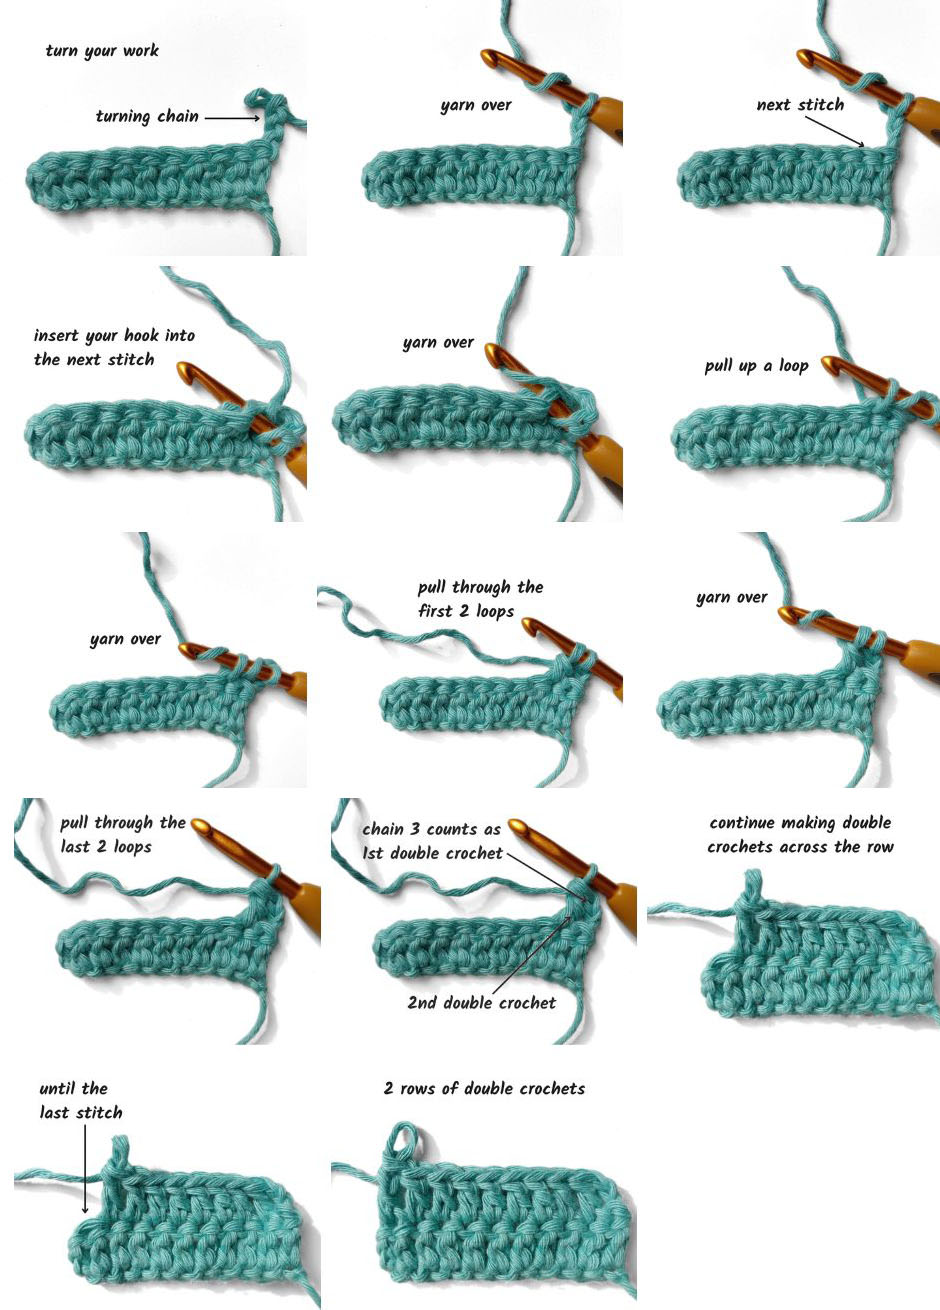
When you get to the end of the row, you’ll turn your work and stitch on the tops of the stitches you just made. But just like you start the first row a chain or several away from the end, you’ll want to do that again on the next row.
To do this, you work a turning chain at the end of the row. This should be indicated in the pattern how many chains to work at the end, but it’s the same number as you skipped when you started the first row.
For example, you would chain 1 at the end of a row of single crochet, then turn your work over so you’re ready to work the first stitch of the second row into the last stitch from the previous row. Likewise, because you skipped three chains at the beginning of a row of double crochet, you need a turning chain that’s three chains long.
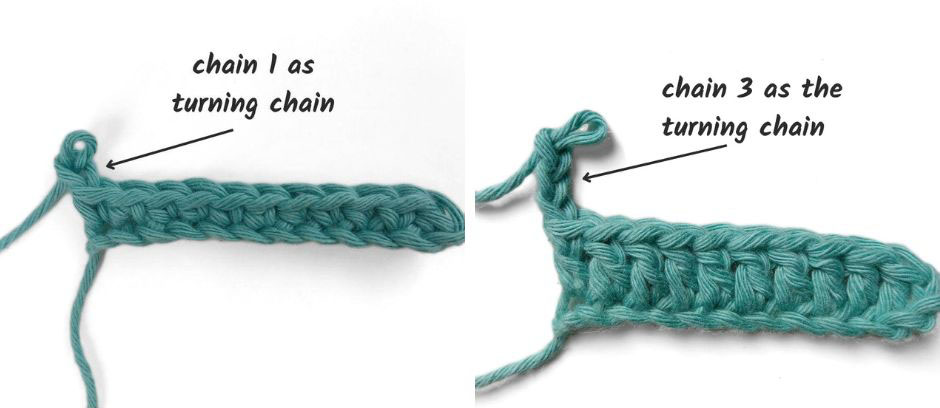
Does the turning chain count as a stitch? Sometimes. The crochet pattern you are working will tell you if you should count it as a stitch or not.
Where To Insert Your Crochet Hook
As mentioned above, for most basic crochet stitches you will work by inserting the hook from front to back under the two parts of the “v” at the top of the stitch or chain.
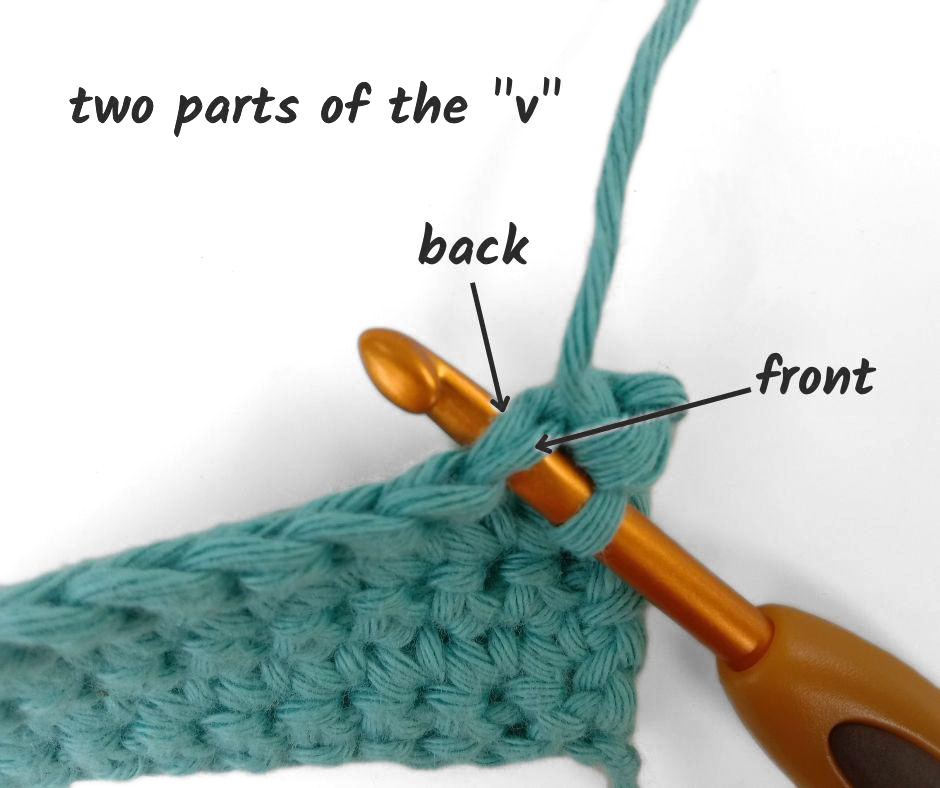
Stitch Loops
Technically these bits of yarn are known as loops, so if you see the note to work into the front loop or back loop only, that’s what it means. The front loop is the one closest to you as you stitch, while the back loop is toward the back. If you’re working in one loop only, put the hook under that loop and work your stitch as normal.
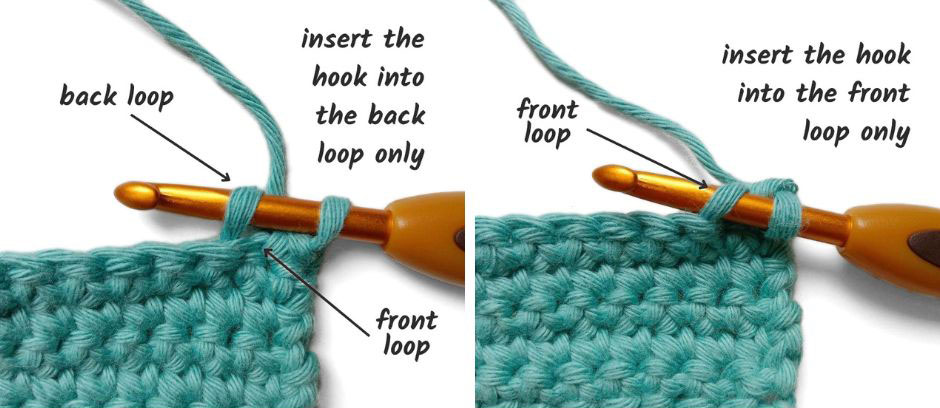
Another possibility is working a front post or back post stitch. The post, you may remember, is the body of the stitch below the loops.
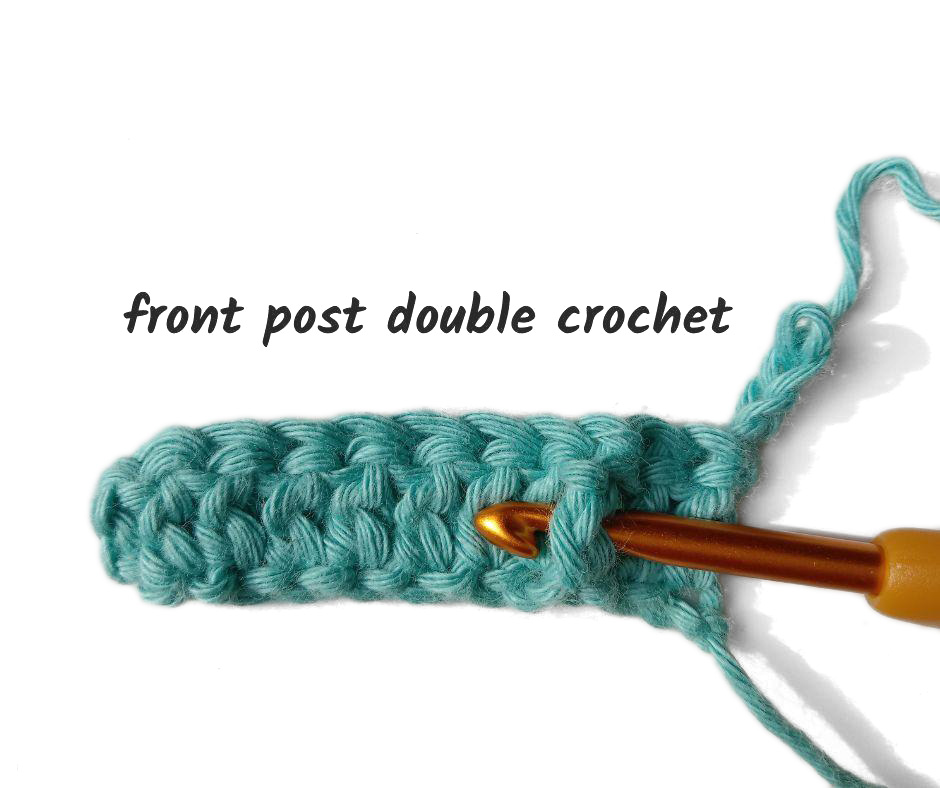
Front Post Crochet Stitch
To work a front post stitch, insert your hook from front to back on the right side of the post, then wrap the hook around the post and go through the left side of the post from back to front.
Back Post Crochet Stitch
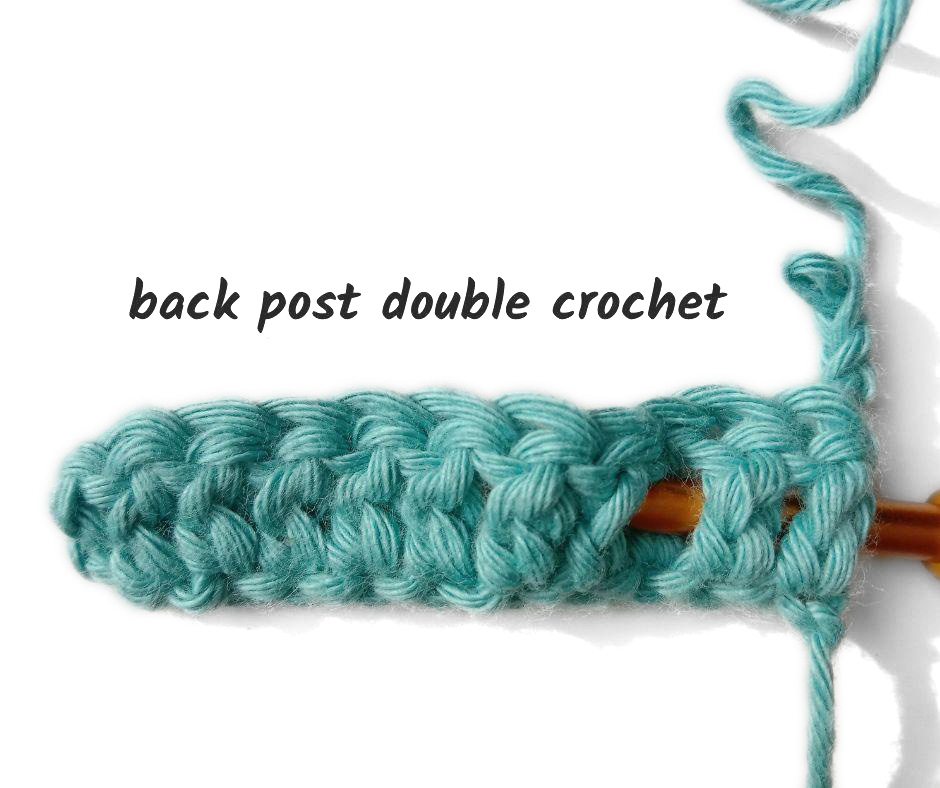
To work a back post stitch, you do the opposite: start by going from back to front on the right side of the post, wrap the hook around the post and then go from front to back on the left side. This is harder to explain in words than it is to show, so check out our Crochet Fundamentals course if you need extra help.
Basic Stitches In Crochet
As you learn to crochet and read different patterns, you will find that a lot of crochet is based on the same basic crochet stitches. And they are all worked with combinations of yarn overs and pulling through loops, which you already know how to do from making a chain above.
If you want to practice all the crochet stitches, you can start by making a chain of, say, 20, and then work each stitch in turn for a few inches until you get the hang of it.
These instructions use U.S. crochet terms.
How To Single Crochet (sc)
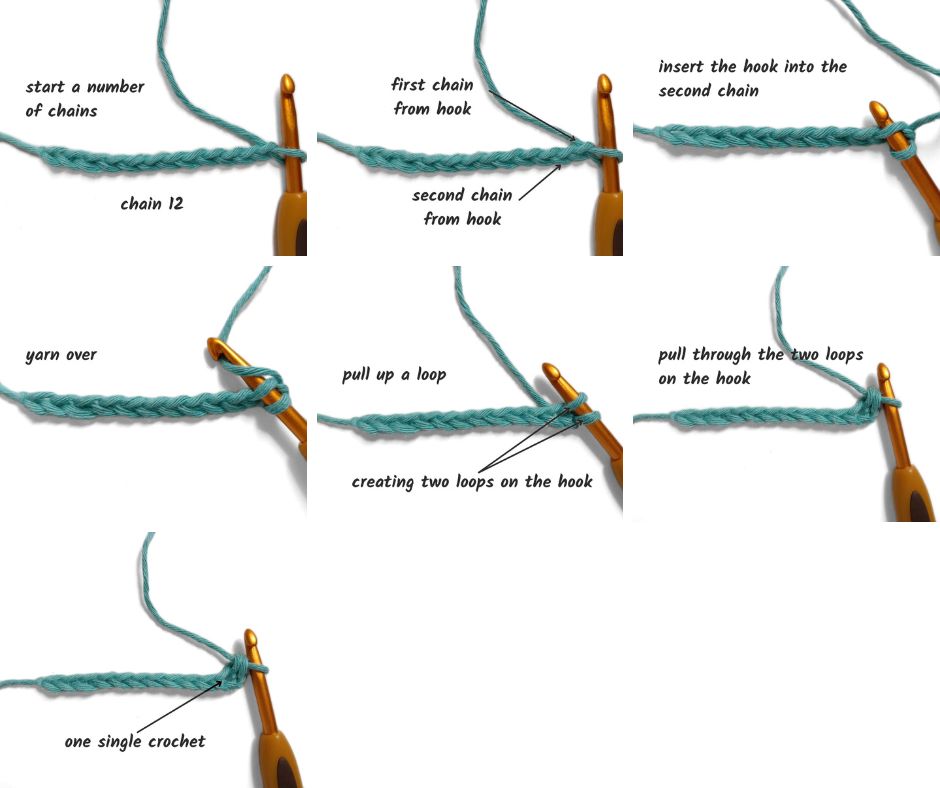
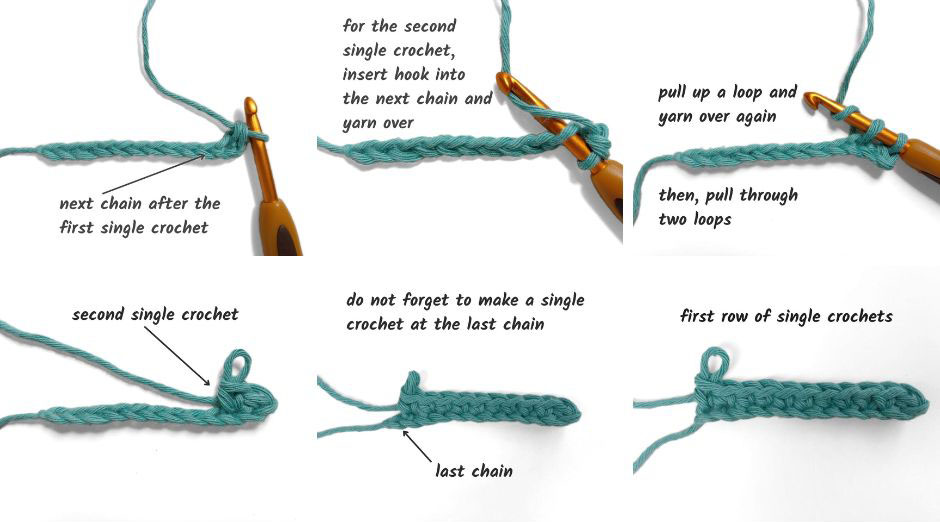
Once you have your foundation chain, insert the hook into the second chain (the chain on the hook doesn’t count). Yarn over, pull up the loop, then yarn over again and pull through both loops so you are back to one loop on your hook.
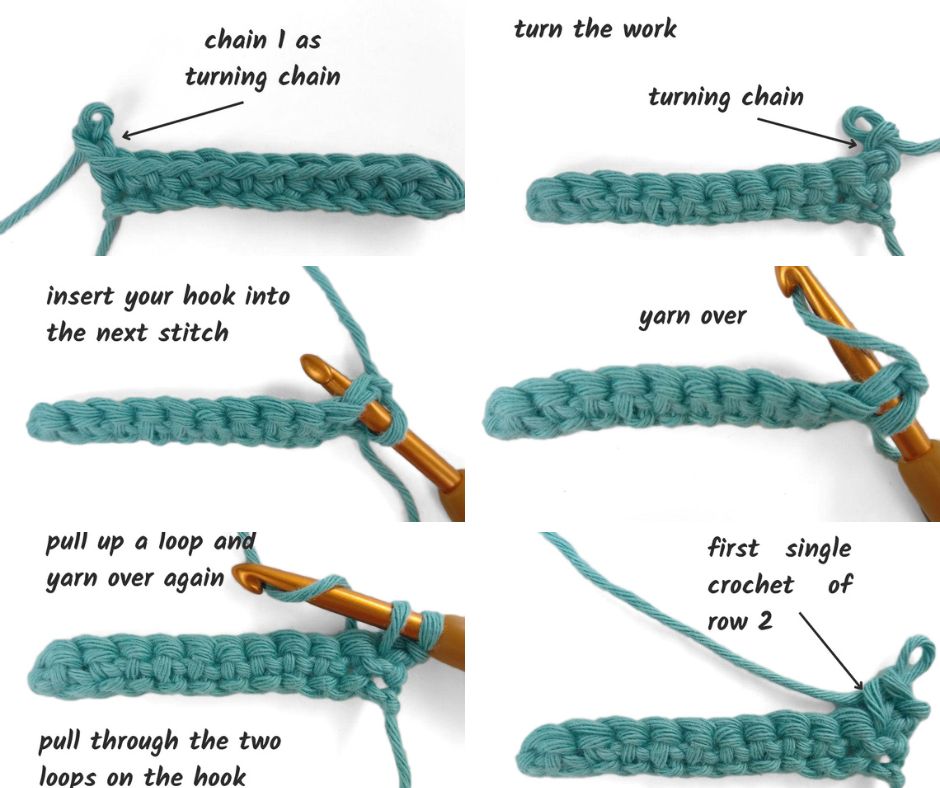
Continue in this manner across. When you get to the end, work a turning chain of 1 before turning the work and continuing across.
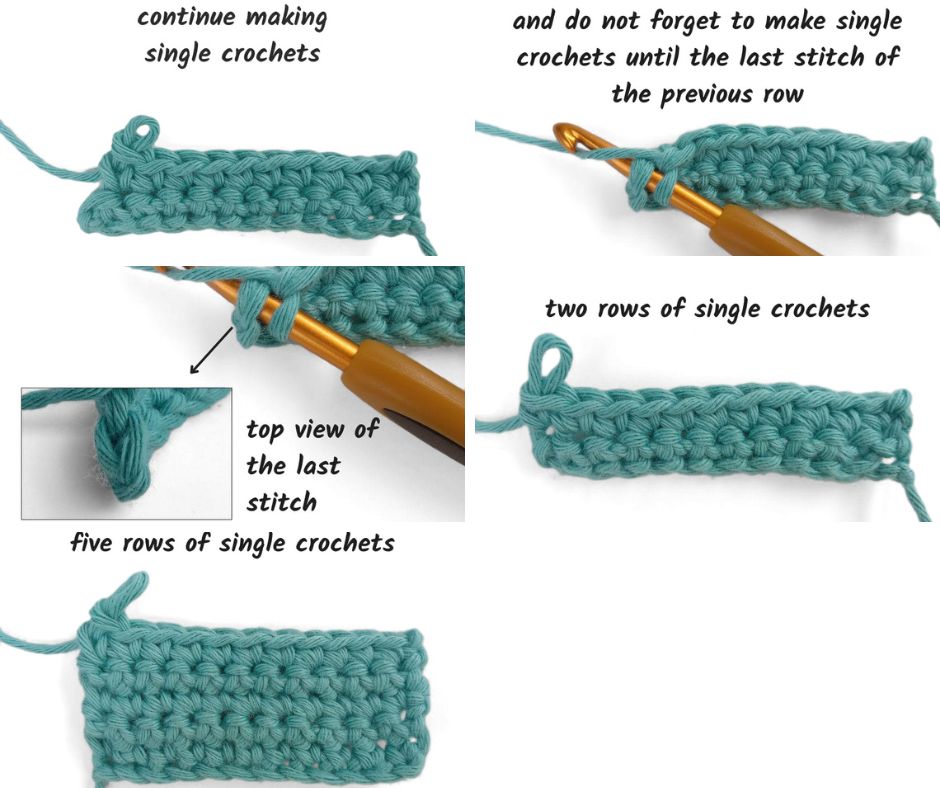
Do not count the crochet turning chain as a stitch. Begin working in the first stitch of the previous row.
How To Double Crochet (dc)
Double crochet and single crochet are probably the most common crochet stitches out there. As you might guess, the double crochet stitch is about twice as tall as the single crochet stitch.
If you’re making a practice swatch, chain 3 for your turning chain. This does often count as a stitch, which means you would skip the first stitch from the row below and work into the second stitch counting from the hook. If you’re starting from a chain you work into the fourth chain from the hook.
Either way, the stitch is formed by yarning over, then putting the hook into the stitch or chain. Yarn over again and pull up a loop so there are three loops on the hook. Yarn over again and pull through two loops, then yarn over again and pull through two more loops so you are back to one loop on the hook again.
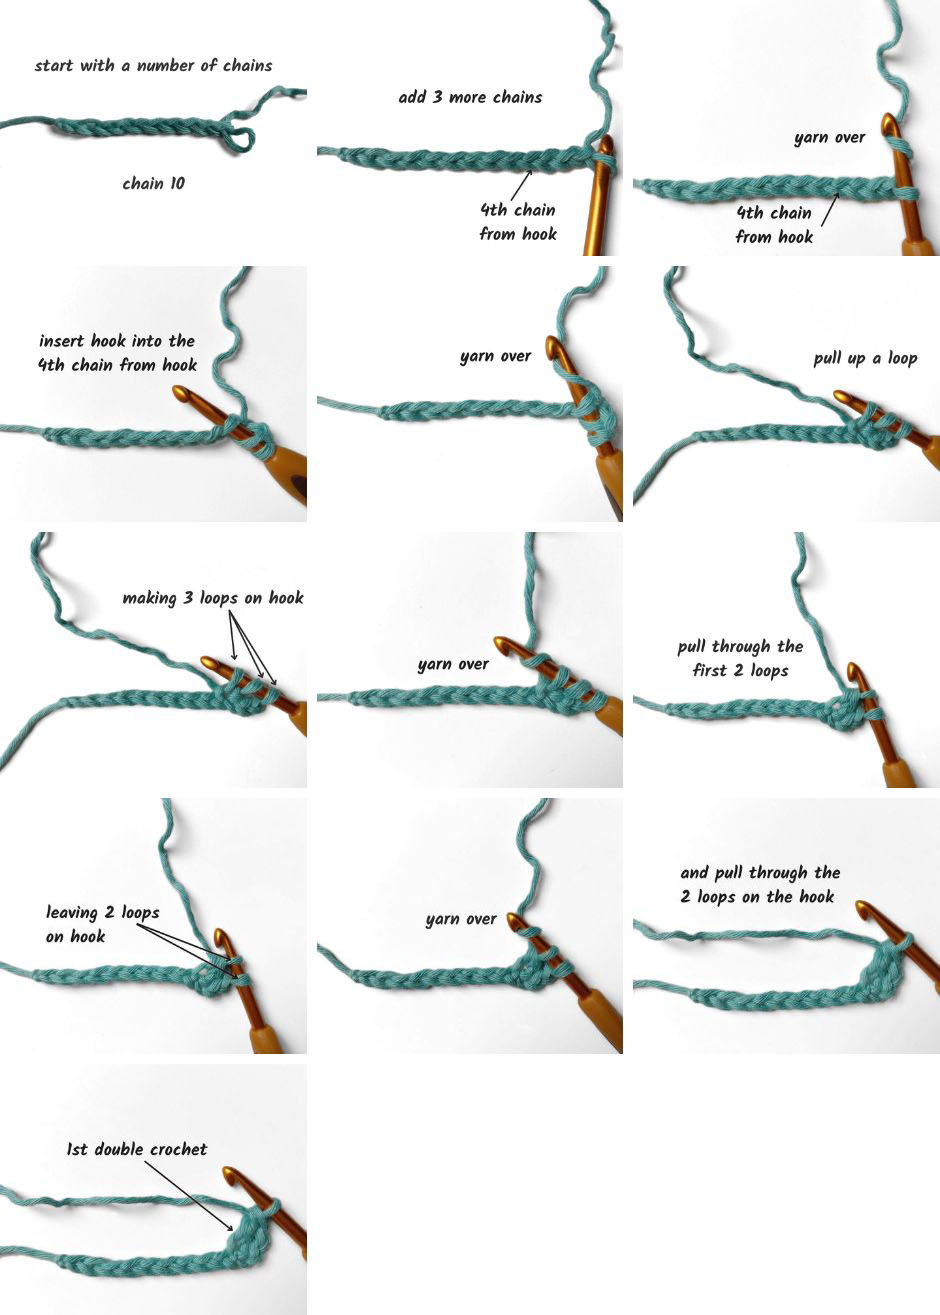
Continue in this manner and work a chain 3 as your turning chain.
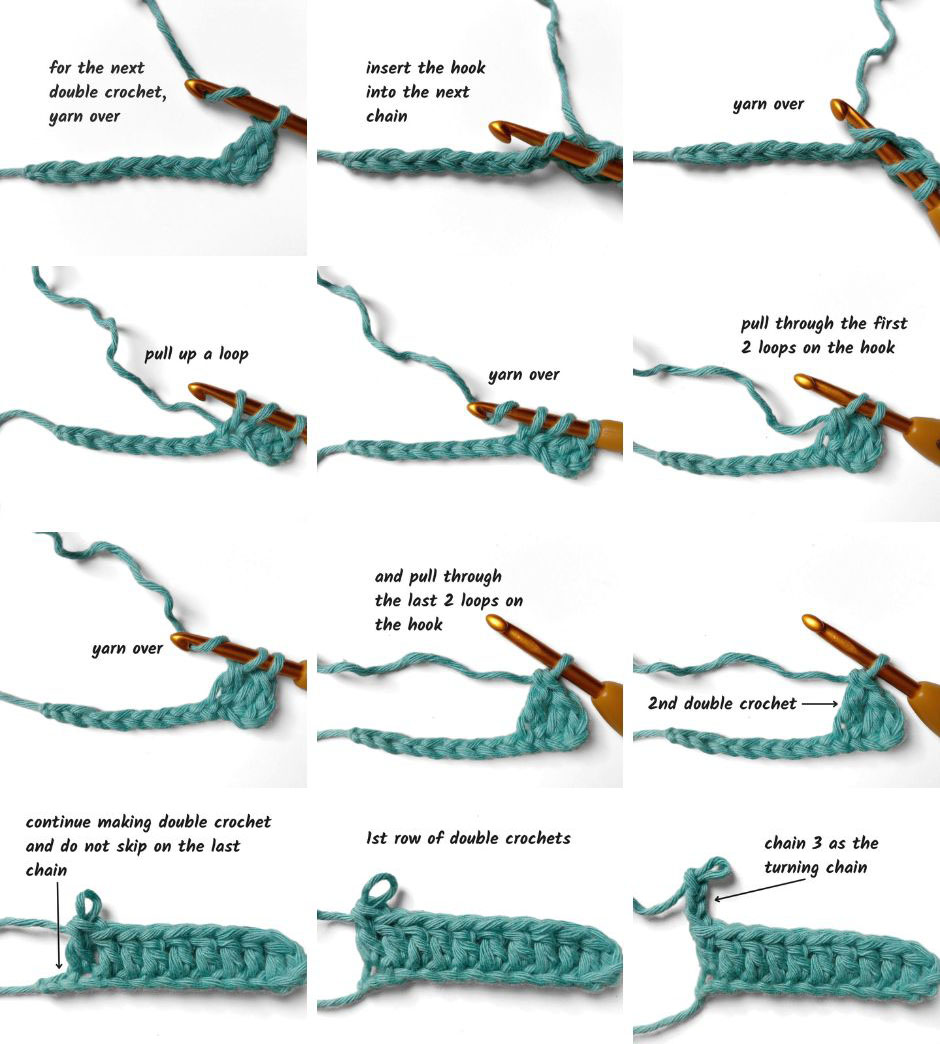
Continue to create the next row of double crochets.
Note: Some patterns will ask you to chain 2 instead of 3 for a double crochet, just as some will count the chain as a stitch and some do not. Always refer to your pattern for the way the designer would like you to do it.
How To Half Double Crochet (hdc)
Now that you know about single crochet and double crochet, you might guess that half double crochet is somewhere in between these two stitches.
Start with a turning chain of 2. (Here again this may or may not count as a stitch.) If you’re starting from a chain, work into the third stitch from the hook.
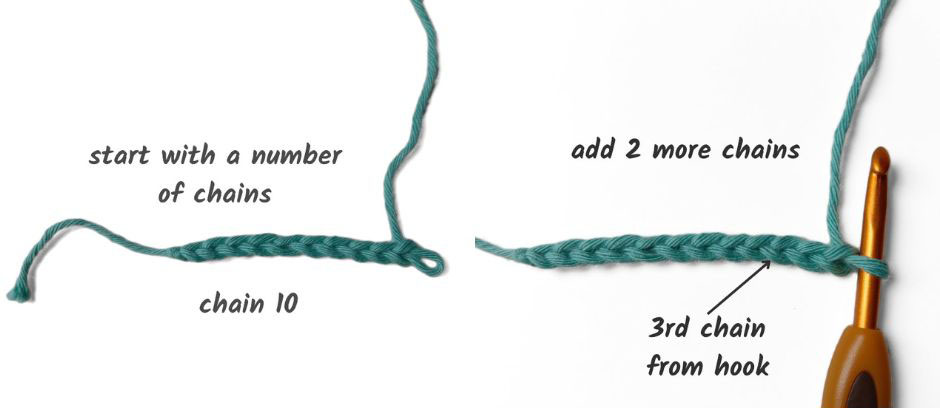
Yarn over, then insert the hook into the stitch. Yarn over again and pull up a loop so you now have 3 loops on the hook.
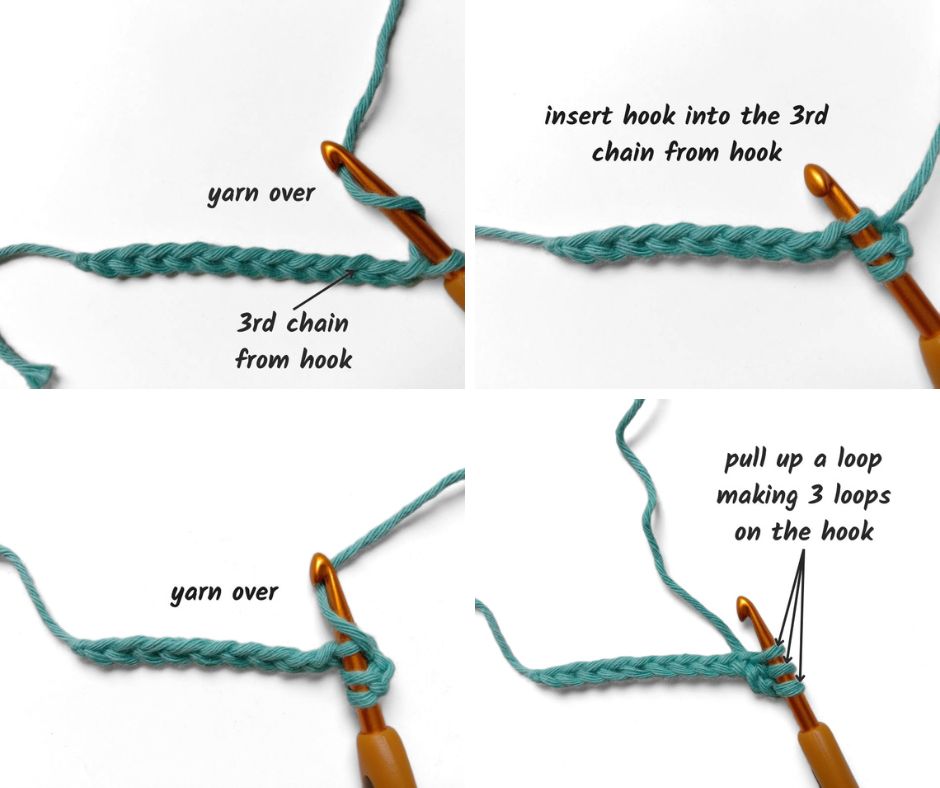
Yarn over again and pull through all 3 loops so you are back to one loop on the hook.
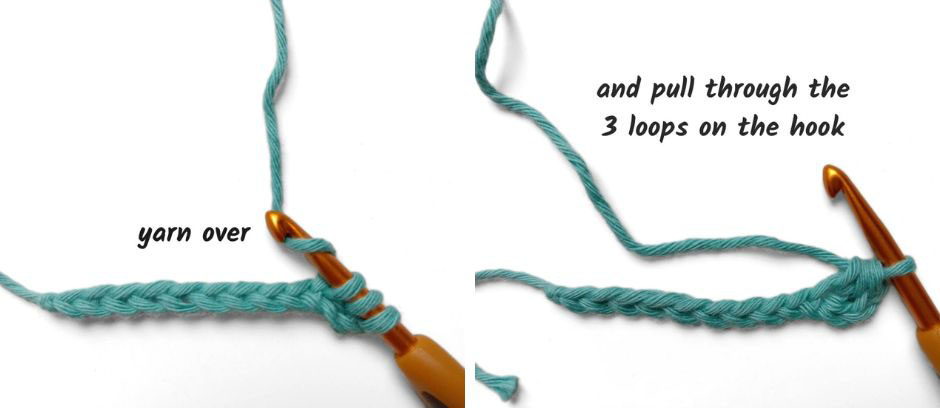
Continue in this manner across, ending with a chain 2.
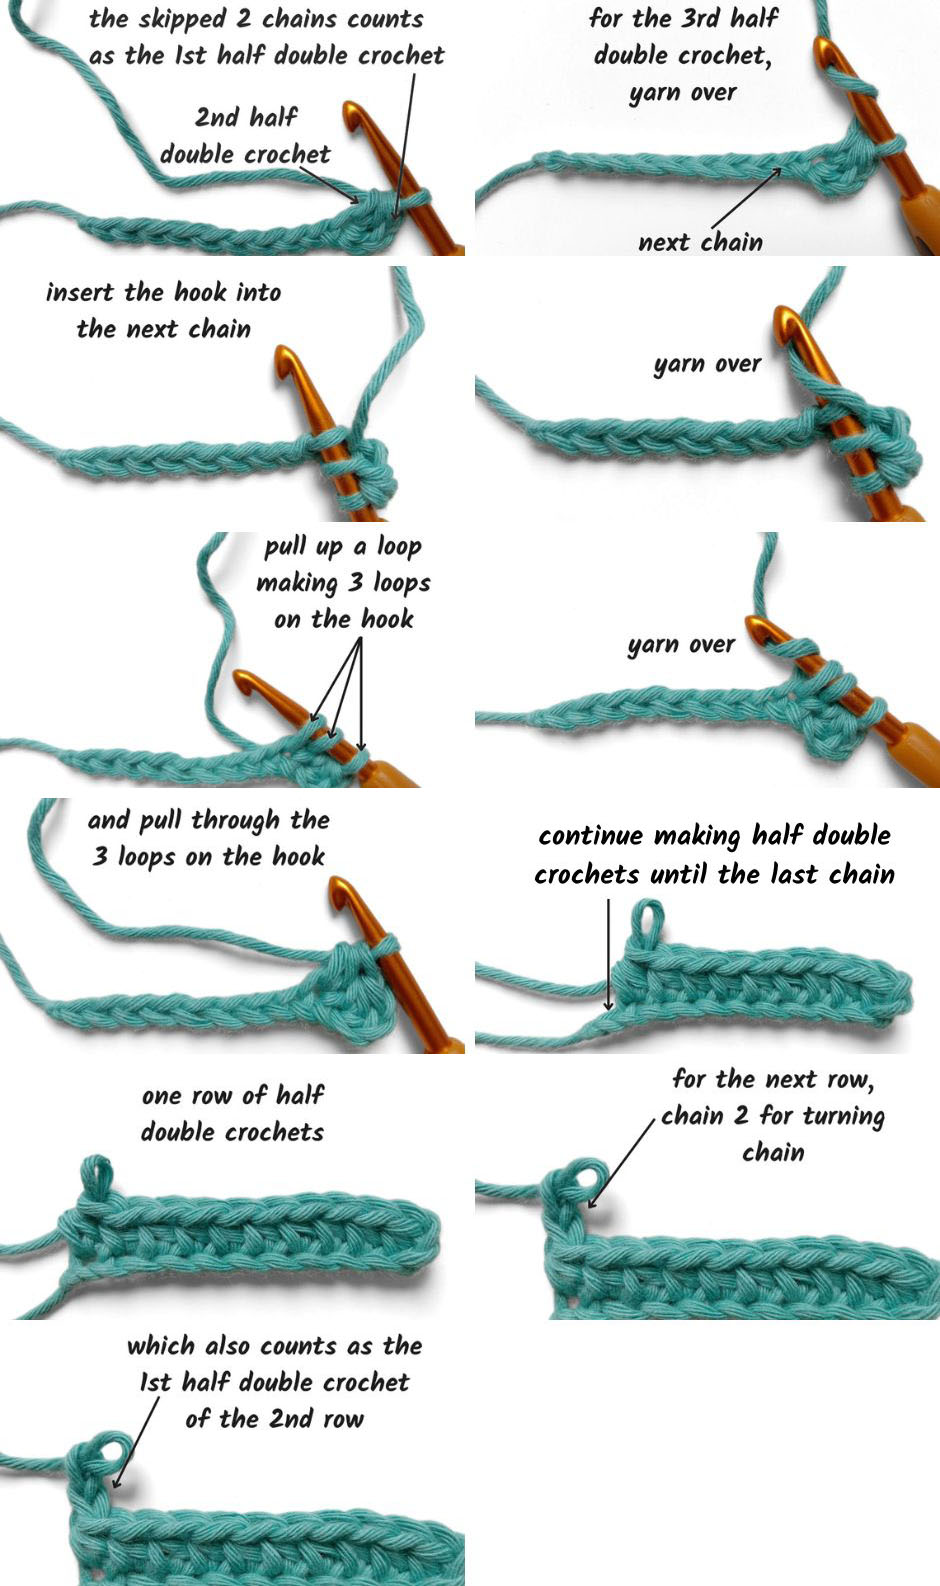
Turn your work to continue half double crochets on the next row.
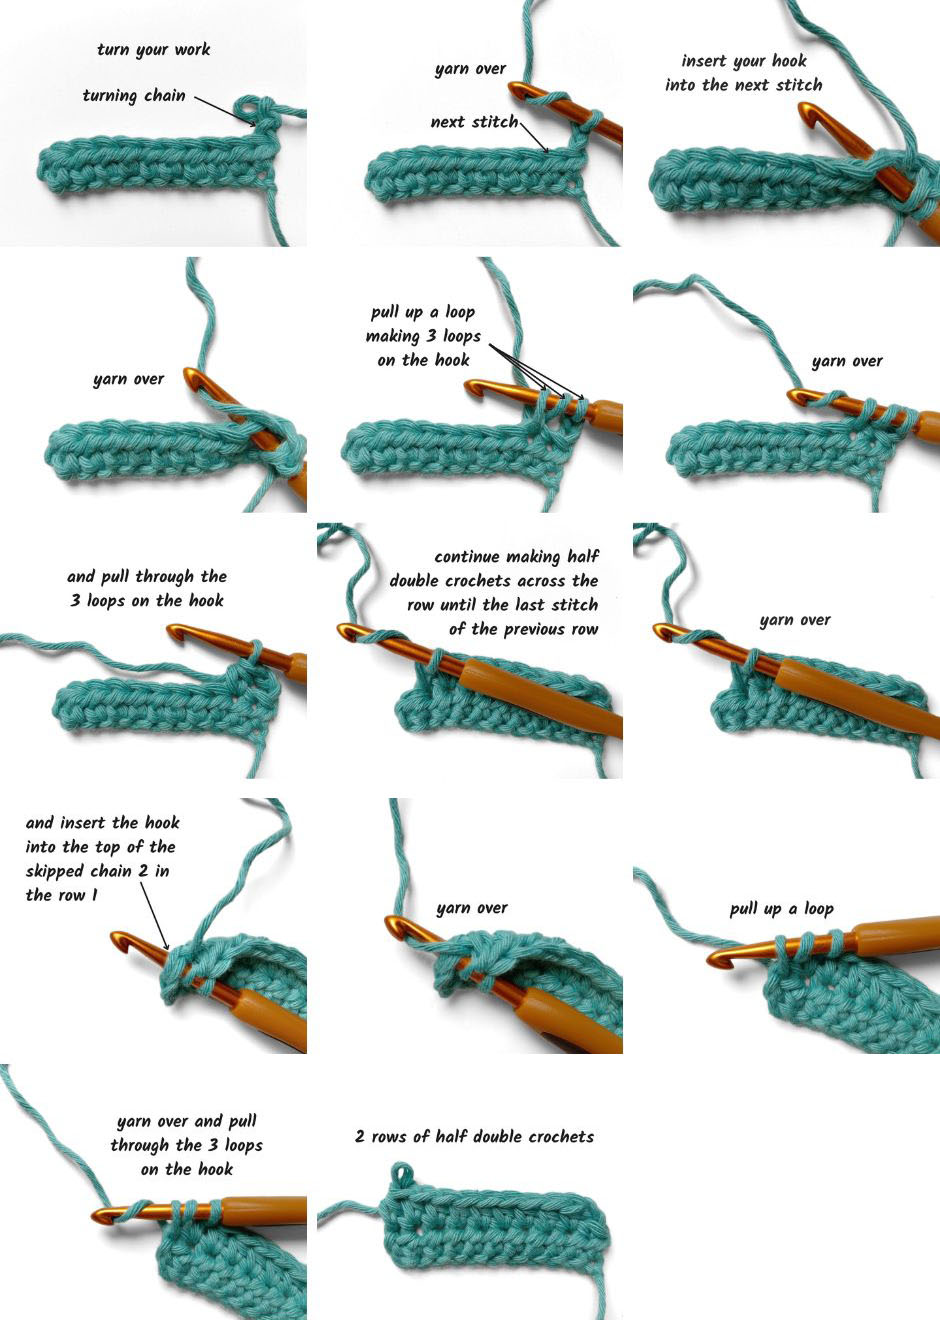
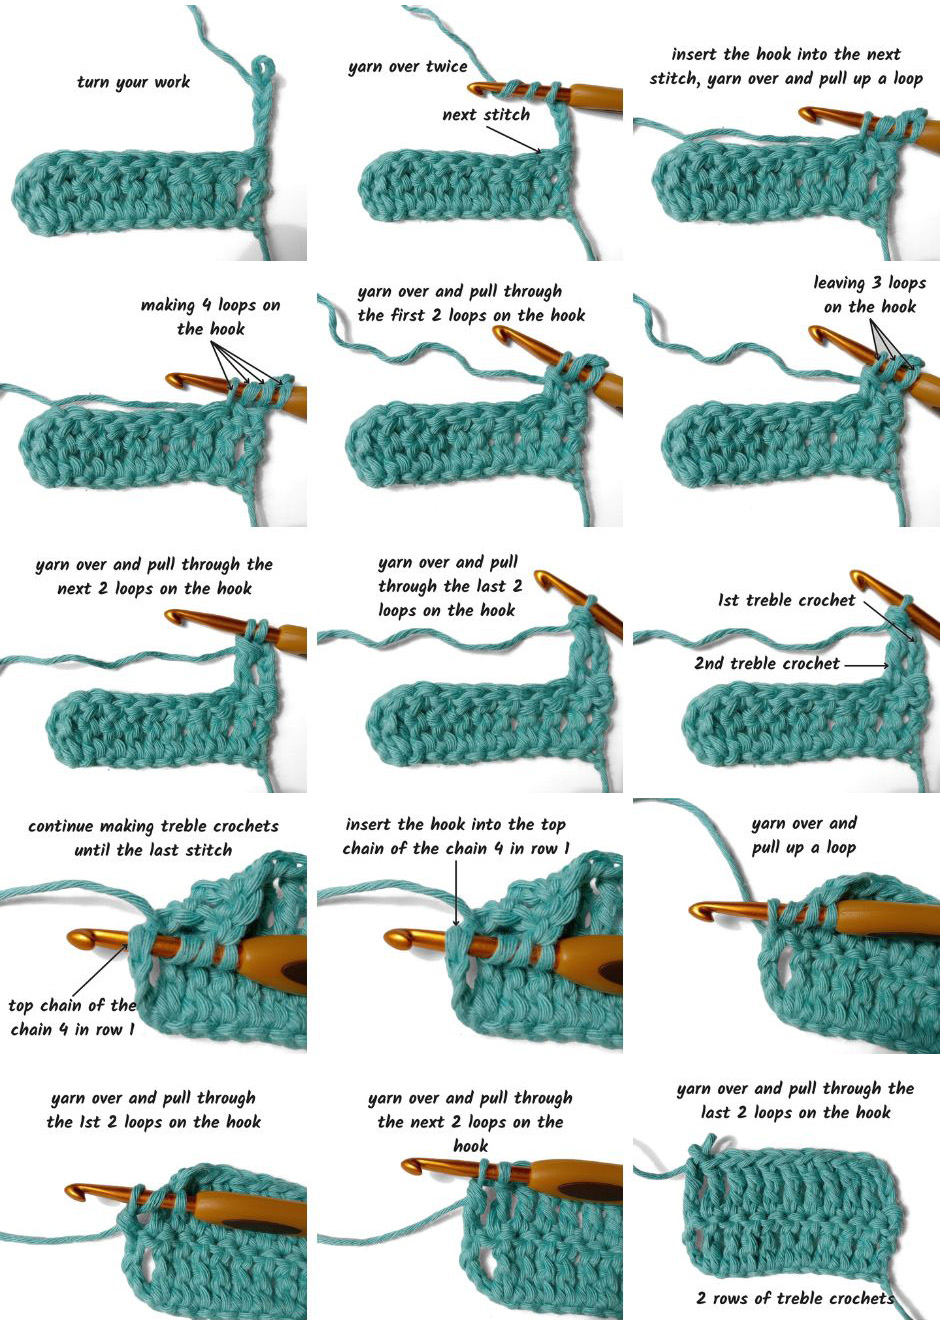
How To Treble Crochet (tc)
The treble crochet stitch is the tallest of the most common crochet stitches, and it’s a lot of fun to stitch because it works up really quickly.
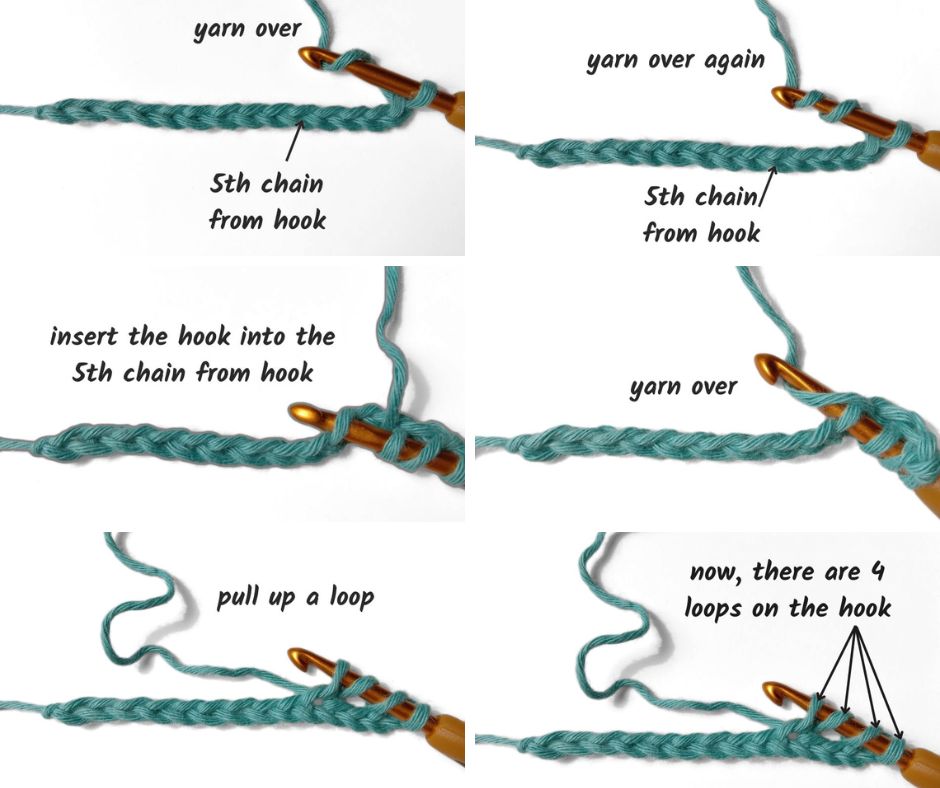
If you’re still working your sampler, your turning chain should be 4 stitches (in a chain, you work starting in the fifth stitch from the hook).
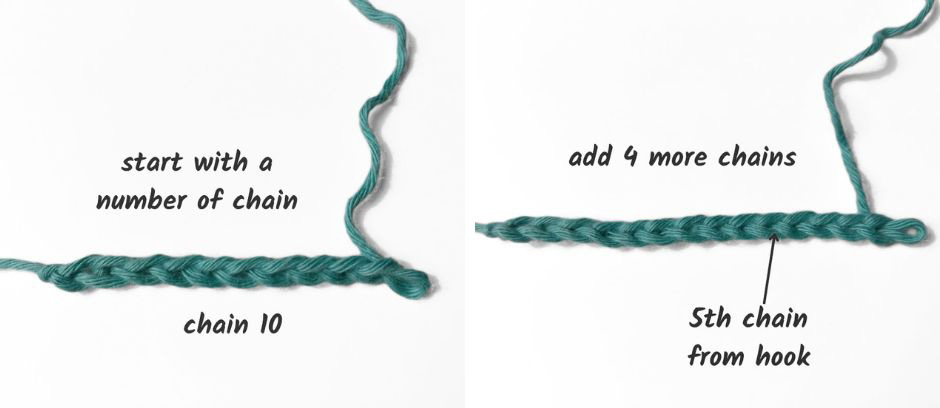
Yarn over twice, then insert the hook into the stitch, yarn over and pull up a loop.
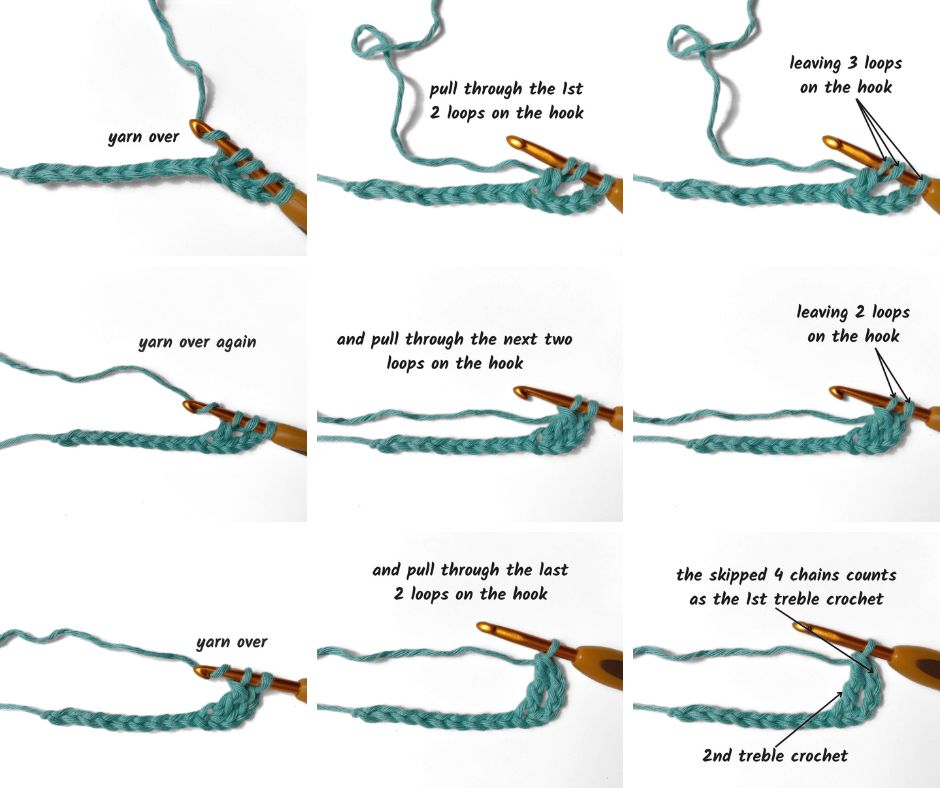
Yarn over and pull through 2 loops. Repeat two more times until you have 1 loop remaining.
Continue in this manner across, ending with a chain 4 turning chain.
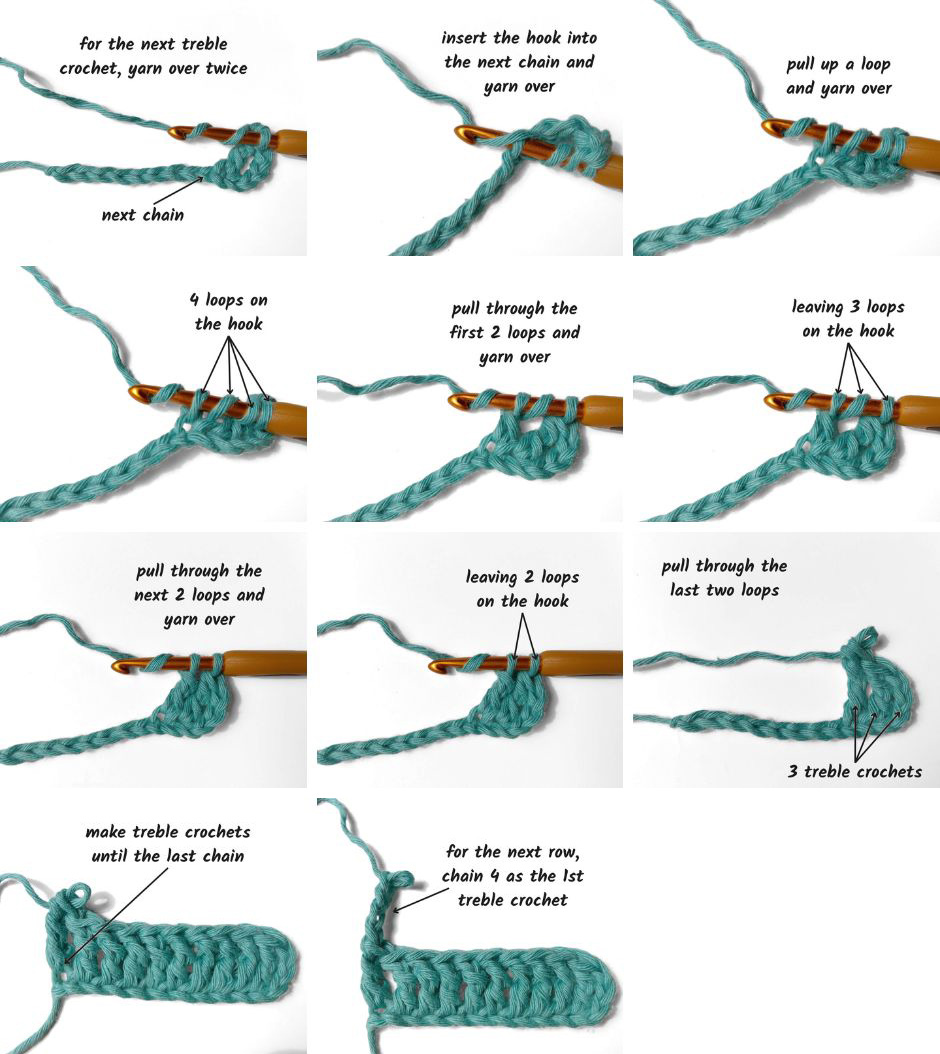
Proceed with the next treble crochet rows.
How To Work A Slip Stitch (sl st)
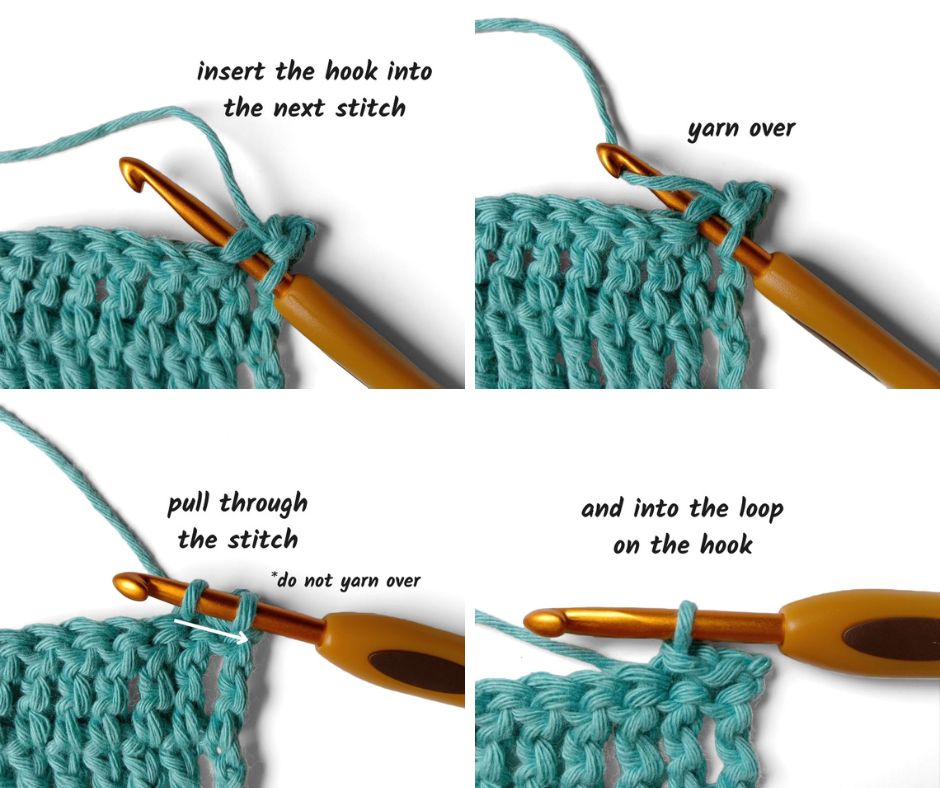
One other handy crochet stitch to learn is known as the slip stitch. This is used to join rounds in a crochet project worked in the round, or it can help you move across the work without adding a lot of height to your project.
To do it, simply insert your hook into the stitch, yarn over and pull the new loop through the old stitch all in one move.
Crochet Skills And Tips To Know
There are so many important things to know as you learn to crochet that will make it easier and make your crochet projects look better from the start.
How To Join Yarn
Whether you run out of yarn as you are stitching or want to change colors as you stitch, it's important to know how to join new yarn in your project.
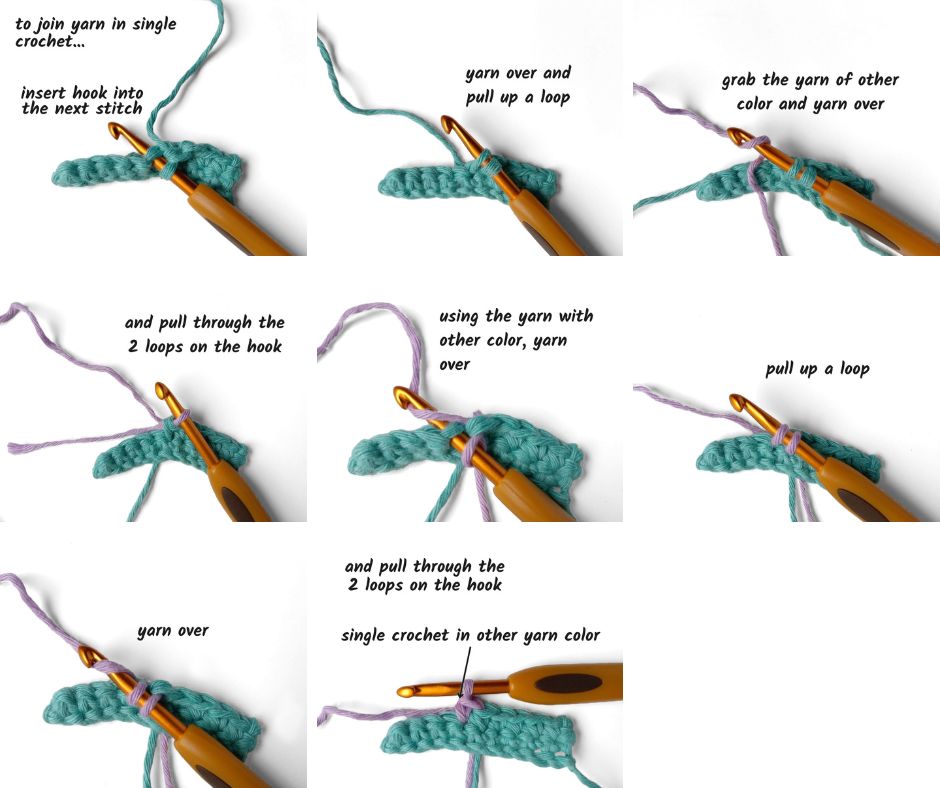
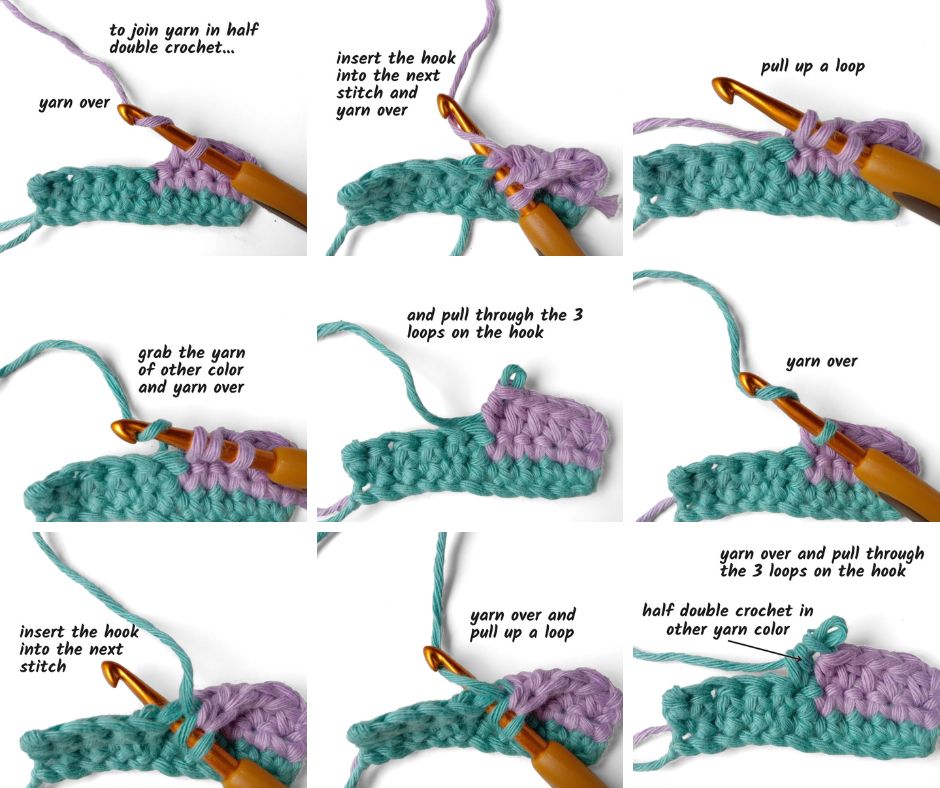
If you are joining in yarn that is the same color as the yarn you have been using, you can just start using the new yarn wherever you need. Leave a few inches of each yarn hanging so you can weave them in later.
When you change colors, you usually do it toward the end of the row. To make the crochet stitches look their best, as you are working the last stitch of the row, do the last step of the stitch in the new color.
For example, if you’re working double crochet, on the last stitch do the last yarn over and pull through the last loops with the new color, and then do your turning chain in that color and go on as usual.
Joining in Single Crochet
Joining in Half Double Crochet
Joining in Double Crochet
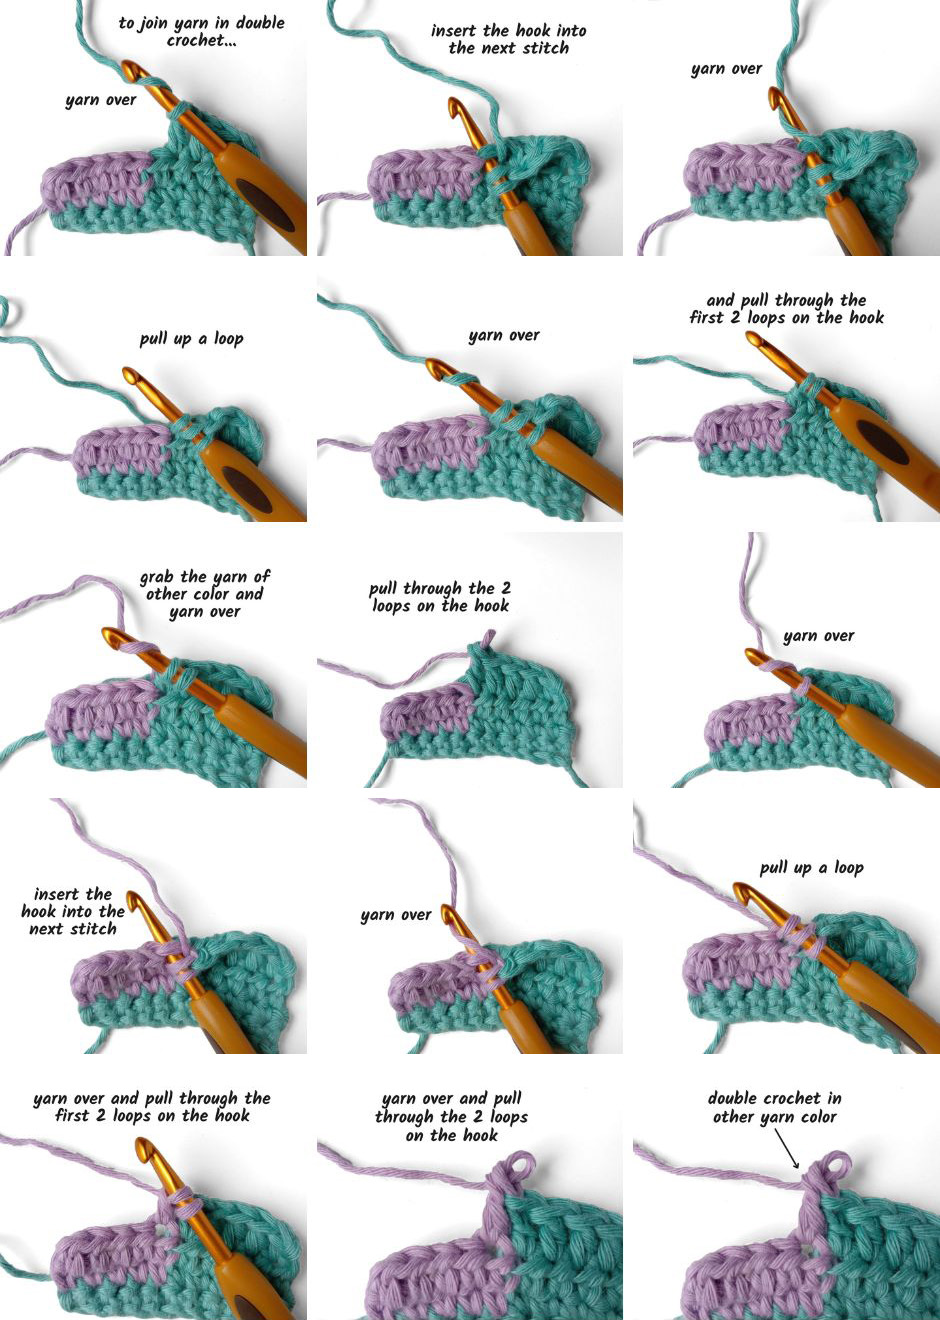
How To Keep Track And Count Stitches
One thing that’s important in beginner crochet is to know how to count stitches and rows as you work. One of the most common mistakes in crochet is working a different number of stitches from row to row, which will make the edges of your work uneven.
When you first start crocheting you might want to count every stitch as you make it to ensure that you are working the right number of crochet stitches in your chain.
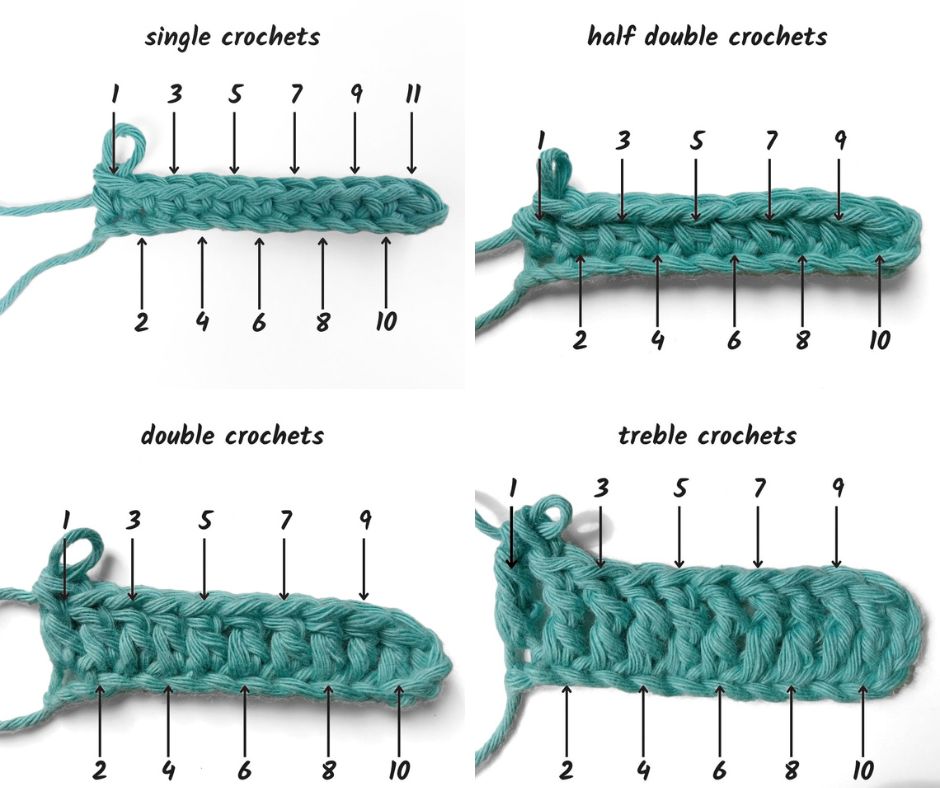
Once you’ve worked a row, you can count stitches by counting the v-like chains on the top of the stitches. Refer to your pattern to determine if the chain at the end of the row counts as a stitch, and remember the loop on your hook does not count as a stitch.
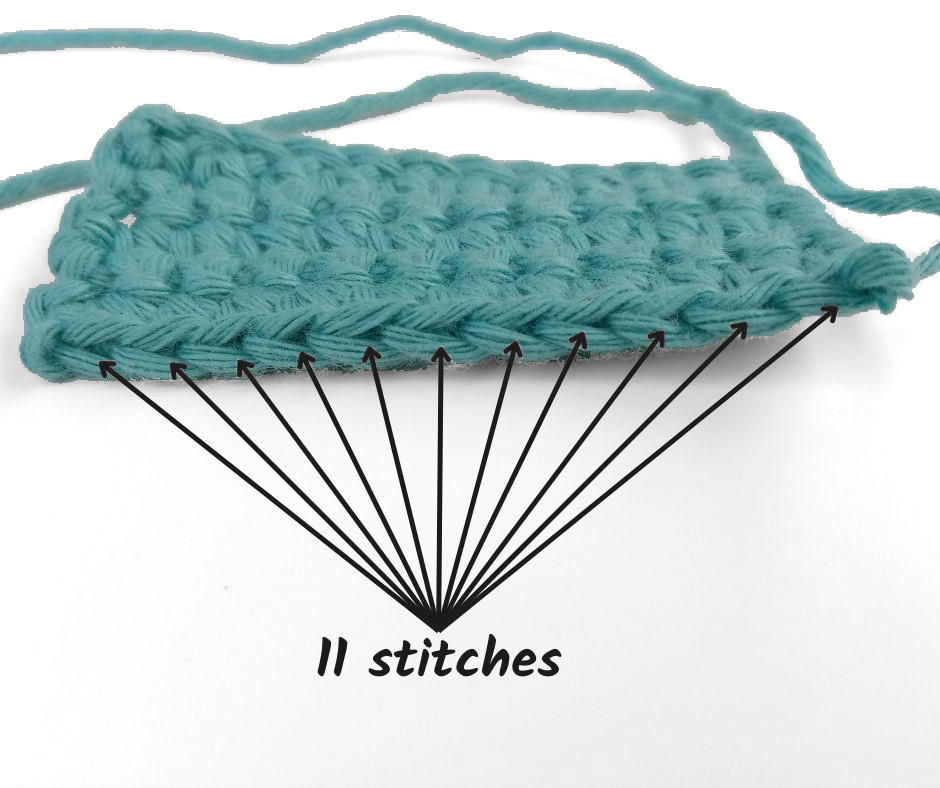
If you find you haven’t worked the same number of stitches in each row, it’s easy to pull out a row and work it again. Just remove your hook from the loop and slowly pull on the working yarn until all the stitches from that row have been removed. Place your hook back in the loop and try again.
How To Count Rows In Crochet
Once you’ve mastered how to count stitches, you’ll also find it handy to know how to count rows in your crochet. Sometimes you will need to work a certain number or rows before an increase or decrease, for example, or if you’re knitting two pieces that should be the same length you’ll need to be able to count rows.
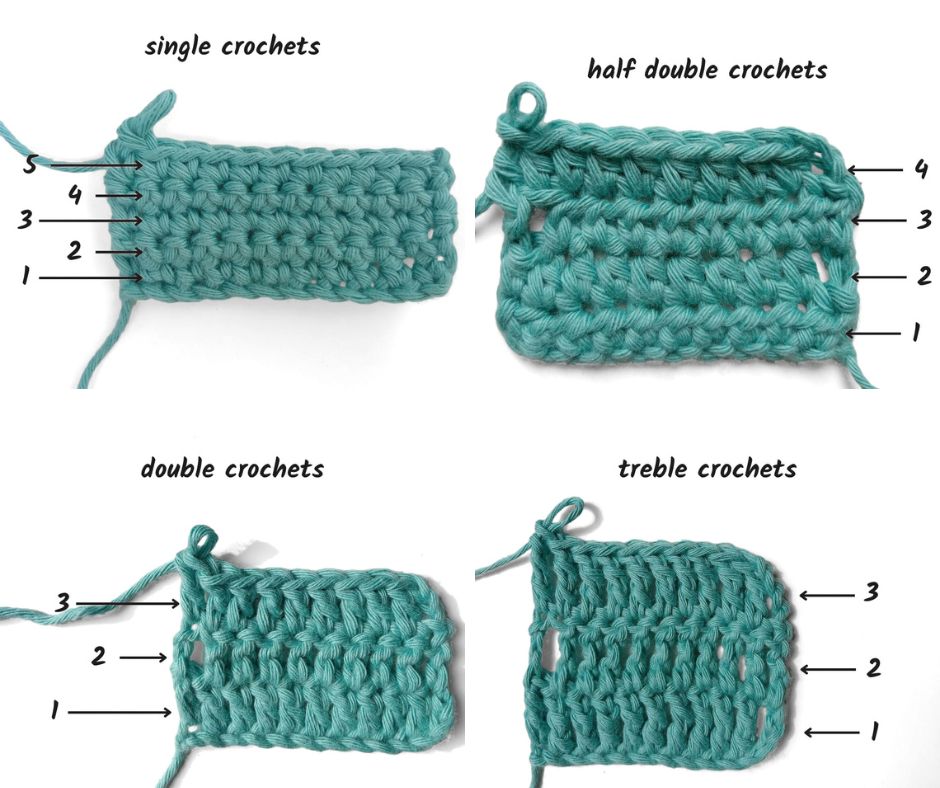
Each crochet stitch looks different in the fabric, so what you are seeing will vary a little depending on the stitch you are working. But there are two general things to look for in your crocheted fabric to make it easier to count rows.
First, each stitch you make has a little space (or a big hole, depending on the stitch you’re working on) on each side. Each horizontal row of spaces represents one row of crochet. So if you count the spaces vertically up the work, that’s how many rows you’ve worked.
Alternatively, if you’re working back and forth in rows, you’ll be able to see ridges in your work between the rows of spaces. If you count the ridges, each one represents two rows.
Pro Tip: One little trick to help you keep track of the number of rows you’ve crocheted is to add a stitch marker every certain number of rows. For example, you may want to add a stitch marker after every 10 rows you crochet.
How To Increase And Decrease Stitches
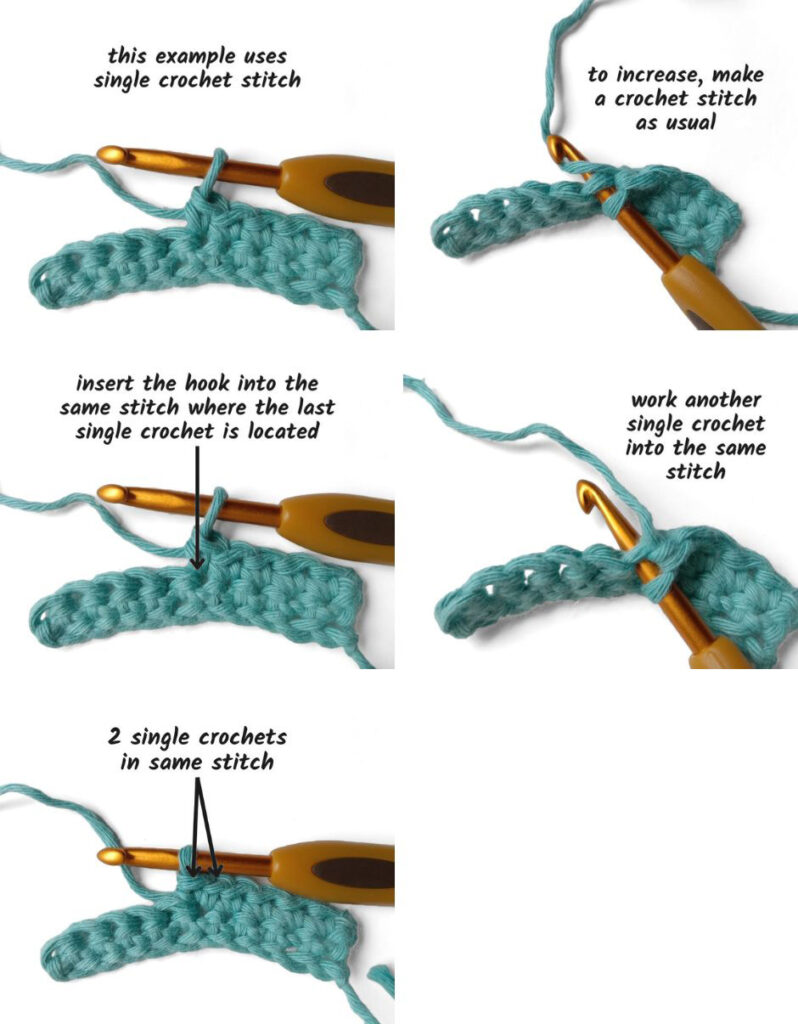
Once you’ve had a little practice crocheting straight pieces, you might want to increase or decrease stitches to shape the top of a hat or make the pieces of a sweater or an amigurumi design
Increasing Crochet Stitches
Stitches are increased in crochet by working more than one stitch into the same stitch from the row below. Your pattern might say something like “work 2 sc in the next st,” which means you would complete two single crochet stitches in the same stitch from the previous row. In the future, this counts as two stitches.
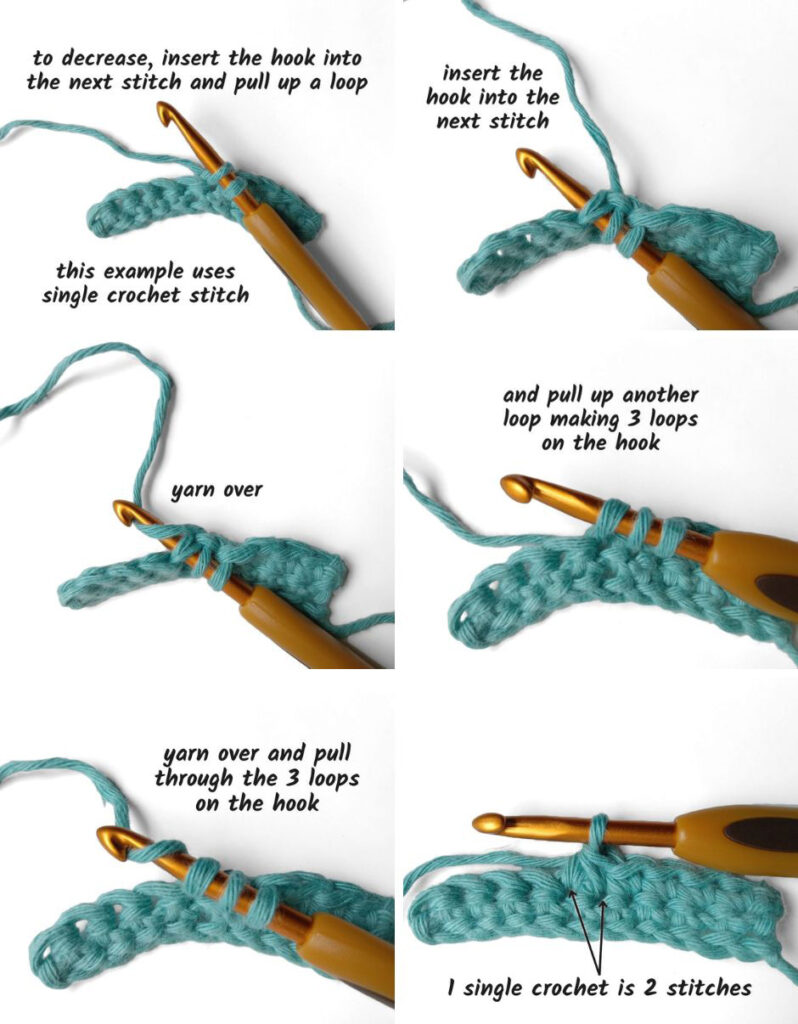
Decreasing Crochet Stitches
To decrease stitches in crochet, you typically work two stitches together. Your pattern might say sc 2 tog, which means single crochet 2 together. To do it, work the first part of a single crochet (put the hook in the stitch, yarn over, and pull up a loop). Do the same thing in the next stitch, then yarn over and pull through the 3 loops on your hook. This will now count as one stitch.
How To Crochet Straight Edges
One of the most frustrating problems for people learning how to crochet is that the sides of their projects often are not straight.
As mentioned earlier, a common reason for this problem is that you’re working too many or too few stitches in some rows, which often happens because you are stopping working the row too soon or you are adding an extra stitch in your turning chain from the previous row.
Counting stitches can be really helpful when you are starting out to make sure that you’re working the same number of stitches in each row.
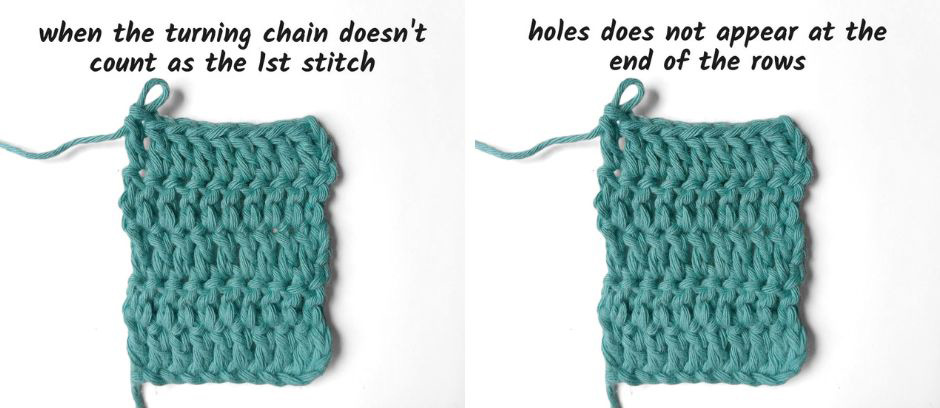
Some stitchers say that not counting the turning chain as a stitch gives them more even sides, because skipping a stitch at the beginning of each row makes for bigger holes than you normally have in your stitches. Also the turning chain doesn’t have as much structure as a stitch, so it tends to be floppier and make the edges look uneven.
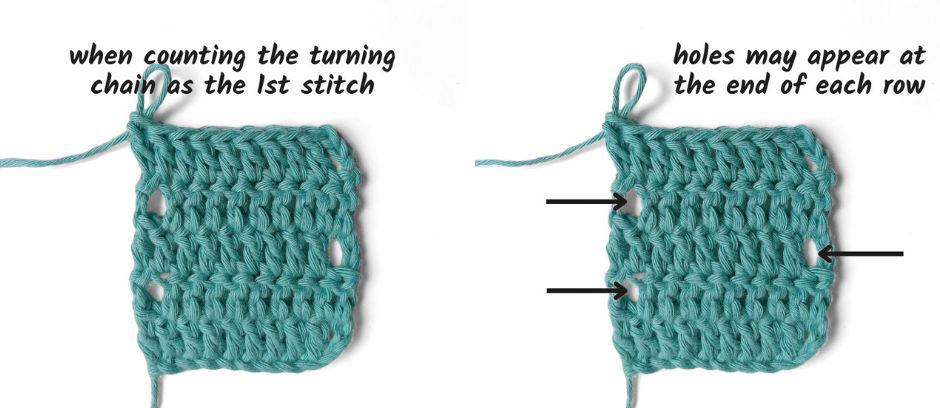
Try it on a crochet swatch: chain a few inches, then work a few rows counting the chain as a stitch and a few rows not counting the chain as a stitch. It may not make a huge difference in single or half double crochet, but the taller your stitches (and the longer your chain) the more noticeable it may be.
How To Fasten Off And Weave In Ends
One of the nice things about crochet is that it doesn’t require much to finish a crochet project. When you get to the end of your last row, when you are down to one loop you can just cut your yarn, leaving a few inches of tail, and draw the tail through the loop and pull tight to close off the end.
This is known as fastening off your crochet.
You will also have at least two yarn ends to deal with – one at the beginning of your crochet project and one at the end. Of course there will be more if you changed colors or used more than one ball of yarn.
To weave in your ends, thread the yarn onto a yarn needle or blunt tapestry needle (a sharp needle will more easily pierce the stitches.) Use the needle to weave through a few of the stitches on the project, then trim the remaining yarn end close to the crocheted fabric.
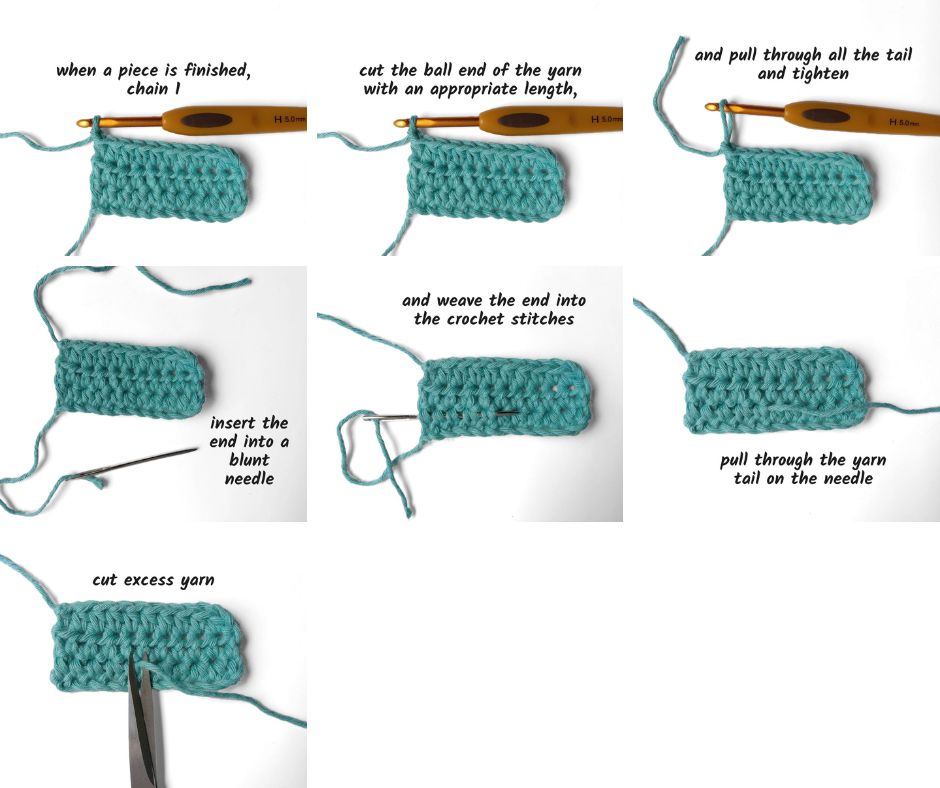
Weaving in your ends makes your project look finished and also secures the yarn so that your project won’t unravel.
How To Make A Magic Circle
Basic crochet projects that are squares or rectangles typically begin from one side and you work straight however long you want your project to be. But there are also patterns that call for working a project from the center out, such as granny squares or projects worked in the round.
Sometimes a crochet pattern will suggest chaining a certain number of stitches and then joining the chain into a ring and working around the ring to start your project. This is quick and easy to do but it also leaves a hole in the center of your project.
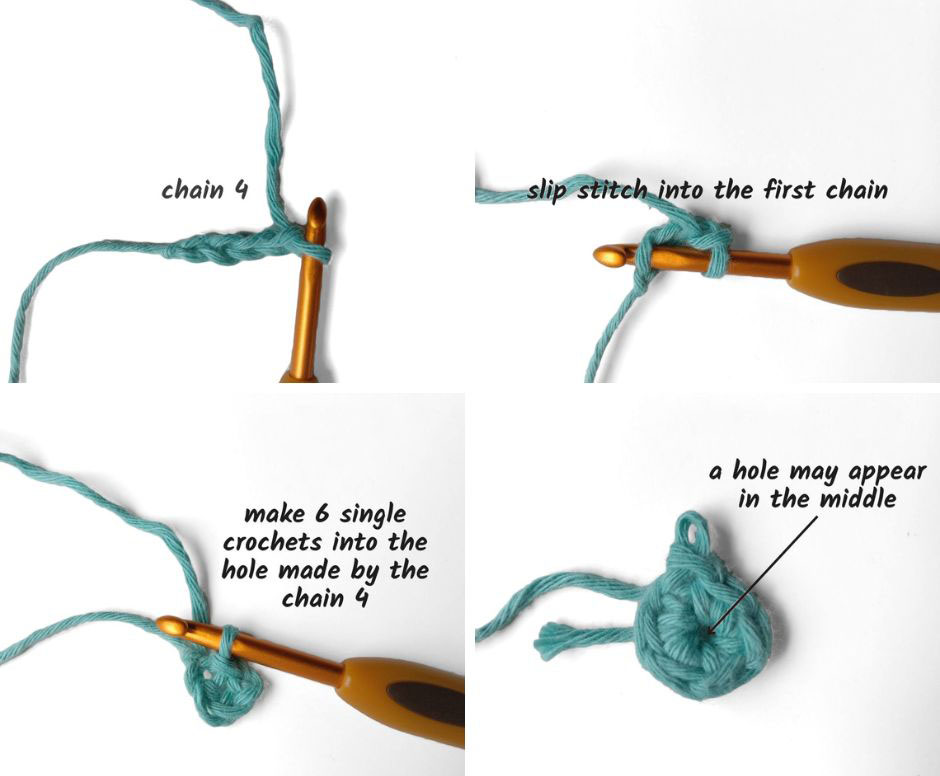
Another way to start a project like this is with a method called a magic ring or a magic circle.
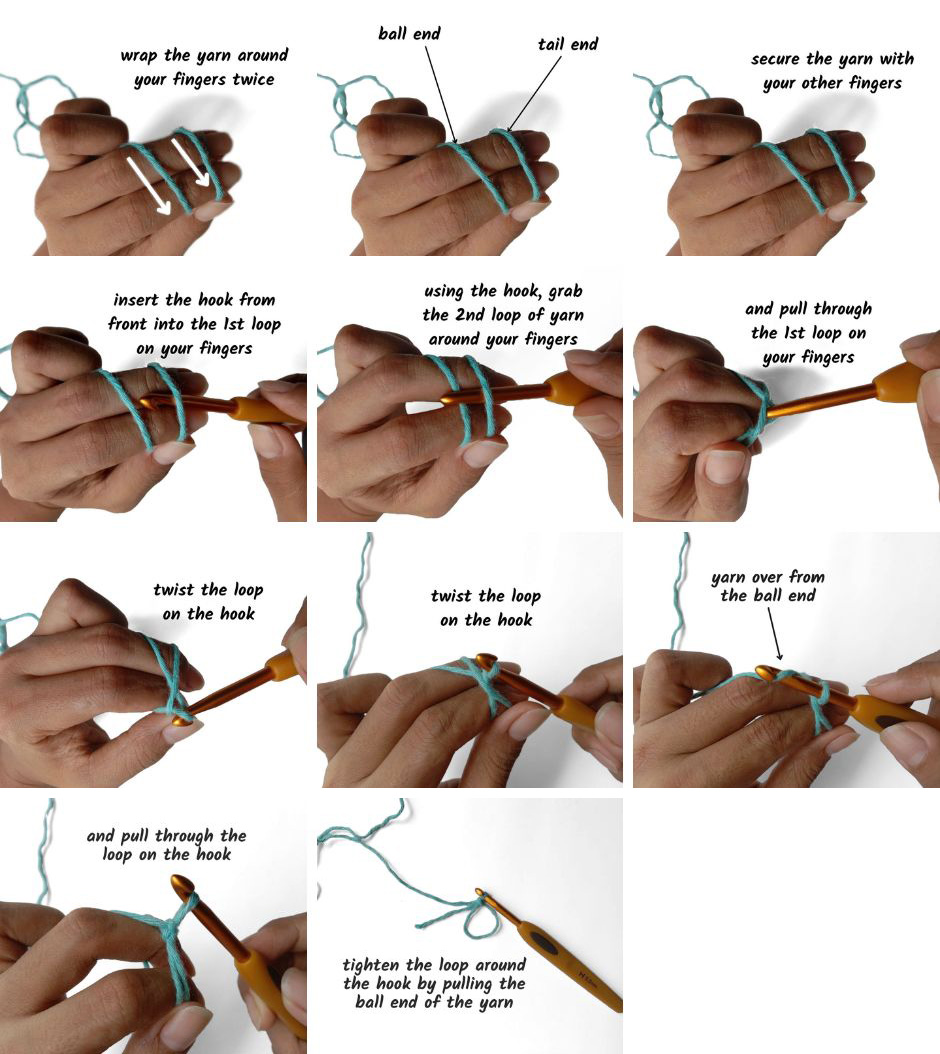
There are several different ways to make a magic circle, but one easy way is to make a loop starting with the tail end of your yarn on the right side, then loop the working yarn up and over the tail end, forming a loop on the left side that looks like a “d”.
Grab the loop with your left hand (sometimes people will put the loop over their thumb or first two fingers to help hold it in place), then take your hook into the loop, yarn over and pull through a loop, then do that again.
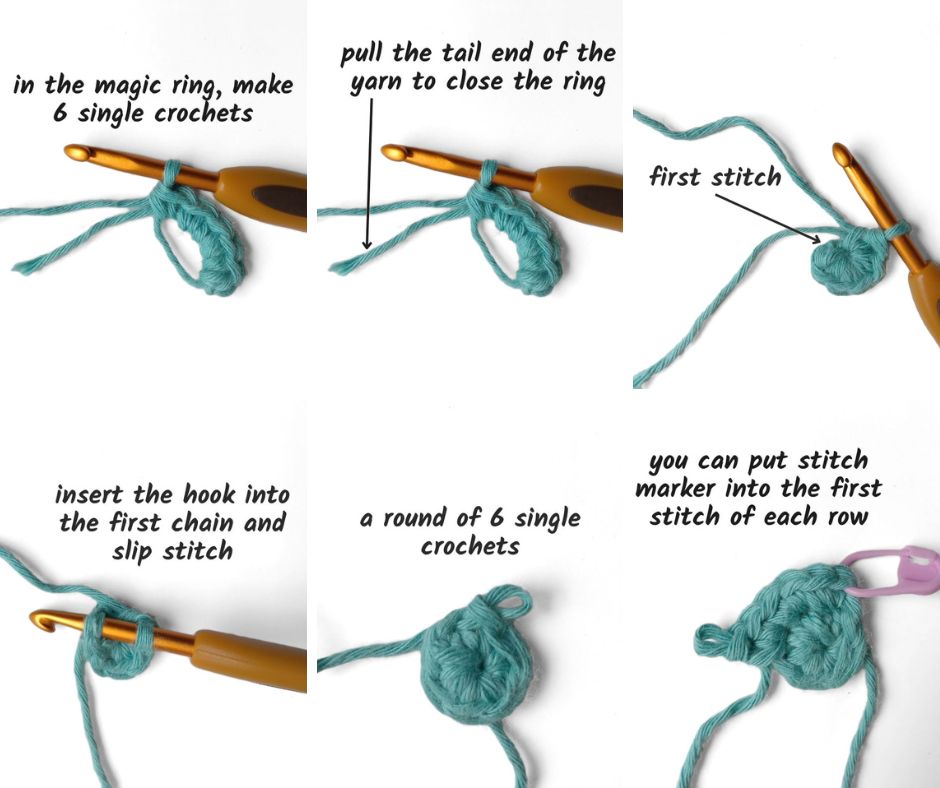
The first stitch is sort of like the slip knot in a chain and doesn’t count as a stitch. From here, single crochet into the loop as many stitches as you need to start your pattern. When you have them all set, pull on the tail end of the yarn and you’ll see the hole in the center magically close up!
How To Crochet In The Round
Crocheting in the round is the way to make objects that aren’t flat, such as hats, bags, sweaters and other projects.
Instead of working back and forth in rows, turning the work at the end of each row, the rounds build on each other and you are always working from the front side of the fabric.
Some patterns will be worked in a spiral, where you do not join the rounds together and they just build on each other as you stitch.
Other crochet projects will call for joining the round and working a chain at the end of the round as if you were doing a turning round but you don’t actually turn.
To join the round, when you have worked your first round of stitches (or after making your magic circle) you work a slip stitch to join the last stitch to the first stitch. Then you work a chain if the pattern calls for it and continue.
Best First Crochet Projects For Beginners
Now that you’re getting excited about crochet, what are some great first projects for beginners to start with? When you are learning to crochet it’s important to start with easier projects that don’t require a lot of different stitches, shaping or other skills. That’s not to say they are going to be boring, just that they will give you a good foundation in the basics before you move on to more complex patterns.
Some of our favorite patterns for new crocheters include scarves, blankets, and dishcloths. These items are squares or rectangles and don’t need shaping to make a useful project.
Many crochet patterns include a skill level on them that is a rough guess of how much experience with crochet you need to have in order to complete the pattern. Those rated for beginners are the easiest, but even as a new crocheter, you can complete patterns marked easy as well.
But you don’t have to stop at blankets when it comes to stitching rectangles. Check out our Crochet Anything with Rectangles course to learn how to crochet bags, sweaters, and lots of other projects just using rectangles.
Here are a few of the best crochet patterns for beginners to try:
Books For Beginner Crocheters
Sometimes you might like to have a reference crochet book instead of learning everything from videos or posts on the Internet. (Though that is great, too!) Here are a few of our favorite books for crocheters:
- Crochet Techniques & Tips
- A to Z of Crochet: The Ultimate Guide for the Beginner to Advanced Crocheter
- Crochet For Beginners: A Complete Step By Step Guide With Picture illustrations To Learn Crocheting The Quick & Easy Way
- Teach Yourself VISUALLY Crochet
- Complete Crochet Course: The Ultimate Reference Guide
Are You A Visual Learner Who Needs More Help To Learn How To Crochet?
We’ve got you covered if you need a little more help learning how to crochet. Our Crochet Fundamentals masterclass has all the tips, tricks and techniques you need to crochet with confidence. Just a few things that are covered:
- Yarn and needle selection
- Making basic crochet stitches
- Finishing techniques like blocking, seaming and weaving in ends
- Working through the front loop or back loop
- Adding crochet edgings to projects
- And much more
This extensive crochet class really has everything you need to know to go from a beginner to someone who is comfortable enough to try all sorts of projects. If you want to learn more stitches now that you have the basics covered, our Ultimate Crochet Stitch Library has 45 different stitches for you to try. The library includes crochet video tutorials and pattern ideas to get you started using those stitches and will inspire you to try adding different stitches to your crochet projects.
Looking for more great crochet pattern: 40+ Simple Beanie Crochet Patterns, 30+ Crochet Octopus Patterns

Leave a Reply